Category: General

  • Reviewing so-called Developer fonts: Anonymous Pro

    Reviewing so-called Developer fonts: Anonymous Pro

    I’ve never been one who particularly cares, or even really notices, the font I use when coding.  I’m happy to let someone else make that decision for me.  But today on HackerNews there was not one, but two articles about so-called ‘developer fonts’. Suddenly, typefaces for code became a curiosity I had to explore.

    The two options discussed were Anonymous Pro – a fixed-width font designed for coders by Mark Simonson, and Hermit: a font for programmers, by a programmer by Pablo Caro.  We’ll review Anonymous Pro in this post, then Hermit in another.

    anonymous-pro web page

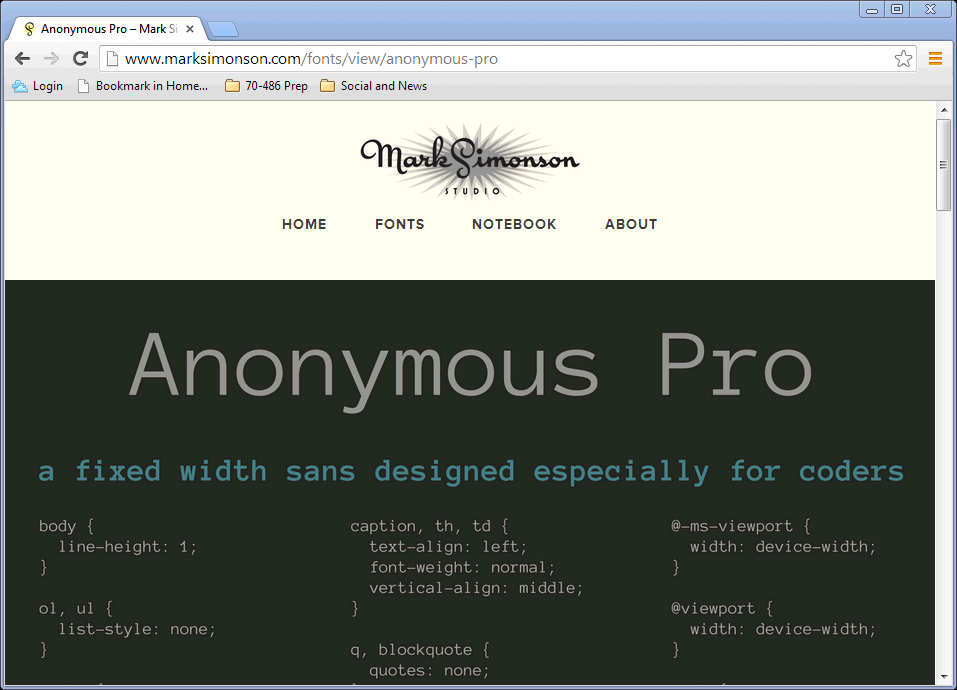
    According to its designer, “Anonymous Pro is a family of four fixed-width fonts designed especially with coding in mind. Characters that could be mistaken for one another (O, 0, I, l, 1, etc.) have distinct shapes to make them easier to tell apart in the context of source code.”

    Faced with new options, I realized I needed some criteria.  What was going to make one font better or worse for coding?

    • mono-spaced – this is the code-writing font table stakes.  It’s hardly a criteria because it is so assumed.  However, we will look at how uniform the character size and spacing is, and how that impacts readability.
    • presentation quality at 1024×768 – needed for viewing on a projector as well as in screencasts
    • simplicity and style

    Installing the fonts and setting up Visual Studio

    After downloading and unpacking the zip file for Anonymous Pro, installing the four variants (Normal, Bold, Italic, Bold Italic) in Windows is as simple as right-clicking on each .ttf file and selecting Install.

    We can then change Visual Studio to use the alternate font.  This setting is changed in the Tools | Options dialog on the Fonts and Colors page, as shown below.

    vsoptions.ng

    It is important necessary to restart Visual Studio after making this change. (It was for me at least!)

    Everyday Use

    Now we’ll see how this new font shows by creating a new html page.  For reference, here is the Consolas 10pt code file first, then Anonymous Pro 10pt.

    consolas-sampleanon-pro-sample

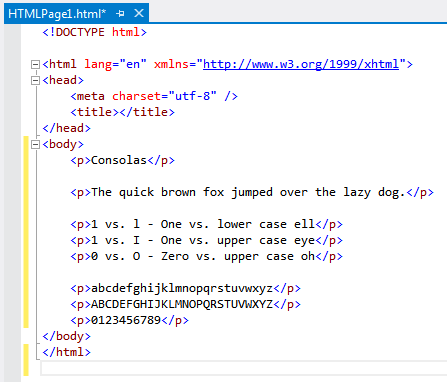
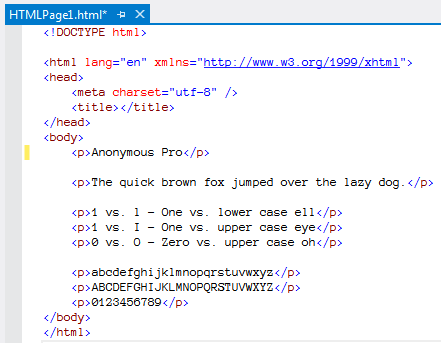
    A few details jump out right away.

    • Both fonts cross the zero to distinguish it from the letter O.
    • Both fonts distinguish 1 from l by angling the top stroke.
    • The lower case ‘s’ in Anonymous Pro appears a bit ‘squished’
    • I like the extra strokes on the Anonymous Pro upper case T and Z, but the T seems compressed.
    • The Anonymous Pro 6 and 9 nearly represent a zero due to the size of the circular stroke.
    • I generally prefer the style of the Anonymous Pro lower case ‘g’.

    Viewing on the big screen

    It’s not uncommon to only have 1024×768 resolution when using a projector on a large screen.  Let’s see how Anonymous Pro stacks up when viewed at this lower resolution.

    Scott Hanselman recommends Lucida Console 14pt bold for presentations.  As such, I will use 14pt bold as our baseline.  Here are the screenshots (click on the image to view the full 1024×768 size).  Again, Consolas 14pt bold first, then Anonymous Pro 14pt bold.

    consolas-1024x768

    anon-pro-1024x768

    The larger size and bolding definitely has an impact.

    • Anonymous Pro lower case ‘e’ is quite compressed, almost resembling a crossed ‘o’
    • However, the lower case ‘s’ does appear more even at this font size.
    • The extra strokes on the upper case T and Z are much more visible, and the T does appear more balanced.
    • 6 and 9 are a bit more clear, but the razor thin separation between body and tail still results in them nearly resembling a zero.

    My Choice

    At first glance, I do like the Anonymous Pro typeface in its general style and flourish.  I also recognize there are lots of other factors that influence text rendering on a monitor, at both the hardware and operating system level.  Still, unless I want to code at a baseline of 14pt, the smaller rendering of Anonymous Pro seems uncomfortable and constrained.  The designer eludes to this condition in the Usage Notes.

    I will say, having gone through this effort, that my awareness of how a font affects code files is heightened.  I will leave Anonymous Pro in force for a while to further get accustomed to it in daily use.

  • Teaching kids to think (not just program)

    Teaching kids to think (not just program)

    8553474140_c50cf08708_cThere’s been a lot of emphasis lately about teaching kids about coding and programming.  There is an entire course on Pluralsight on this topic.  There’s a viral video from Code.org featuring celebrity CEOs, engineers, and even athletes, which opens with the following quote from Steve Jobs:

    Everyone in this country should learn how to program a computer…because it teaches you how to think.

    School districts around the country have rewritten their mission statements with more orientation towards “technical literacy” or “becoming citizens of a digital world”.  And high tech breeding grounds like MIT have produced tools like Scratch that enable kids to create online, story-based games.

    As a developer myself, I find myself often thinking about my six year old and the world in which she exists. She has on-demand access (via Roku) to her favorite movies and shows.  She is drawn to our iPad like a moth to light.  She walks through the grocery store chatting on a pink toy cell phone.  Her world is awash with technology.  It’s all she has ever known.

    So when I ponder the question myself of whether or not to teach my kids how to program, I think Steve Jobs got it backwards.  I don’t believe we should encourage programming in order to teach kids to think.  I believe we should teach our kids to think, and let them apply that thinking to programming.  Become a brilliant problem solver, then do it faster with the technology.  The thinking comes first, then the coding, not the other way around.

    The problem with a ‘programming first’ approach is that, especially these days, the answers to the problems come way too easily.  We have the internet, for Pete’s sake, which is a repository of other people’s solutions to problems.  Programming first orients the objective around completing the program, rather than placing the proper emphasis on thinking your way through a solution.

    Here are a few of the practical ways I am trying to encourage problem-based thinking around our house:

    1. As much as I can, when I do a home improvement project, I invite the kids to participate.  In this context, we’ve dealt with topics like geometry, electronics, and physics.  I don’t expect them really to remember (at this age) how we used the Pythagorean theorem to check if the raised garden boxes were square, but it exposed them to a method to solve a specific problem.  If you’re really up to it, make them the stars of their own DIY video.

    2.  Put problems in the way of them getting what they want.  I am in the process of planning a scavenger hunt to find clues to get the unlock code for the iPad.  If they want to open it up, they have to solve the puzzle.  The hope is that they tie together the motivation of getting what they want with the process of following the clues.

    3. Talk to them about what makes the technology they love work.  I am frequently asking them questions about how they think the games they play know how to keep score, or how the episode of the cartoon du jour ends up on the TV.  Their answers will amaze you, and it creates a teachable moment to encourage them to think of their own game or create their own methods.

    4. Try to not go to the Internet first when they ask a question. This one is hard, because it is so easy to just use the Google to get a quick answer.  We have lots of books in our home, and as often as I can, I try to point to non-digital sources to satisfy their curiosity.  It helps them learn to look things up, and prevents the addiction of instant gratification from taking hold.

    As a parent, part of my challenge is balancing the exposure with the benefit.  We try to limit our kids to a fixed amount of TV or iPad each day, knowing that without this limit, they would undoubtedly consume it morning, noon, and night.  Yet I have to consider what worlds they would explore or create if they had unrestricted time.

    Computers and coding changed my life.  They became a passion, a career, a livelihood.    They may or may not do the same for my kids.  But far more critical than them following in my chosen career path, I want them to know how to face tough problems in life, and think their way through them.

    Photo credit: https://www.flickr.com/photos/dumfstar/

  • Exception message honesty

    The more I work with SharePoint, the less surprised I am when I see things that are unusual, bizzare, or even comical.  Here’s today’s installation (emphasis mine):

    WhatsPopularWebPart: Exception while retrieving data. Exception: System.ServiceModel.FaultException`1[Microsoft.Office.Server.WebAnalytics.ProcessedDataRetriever.DataRetrieverFailure]: The creator of this fault did not specify a Reason. (Fault Detail is equal to Microsoft.Office.Server.WebAnalytics.ProcessedDataRetriever.DataRetrieverFailure).

    I’ve written before about inaccurate progress bars and offered my plea for meaningful exception messages, and I suppose in this error I get both my wishes.  At the very least it’s brutally honest (though it would have been great to out the lazy developer by name).


  • Update User Profile photo using Workflow

    Update User Profile photo using Workflow

    Update: I’ve added a video walkthrough of this technique.

    In my last post, I talked about using a Powershell script to import user profile photos from a SharePoint Picture Library in to the MySites users profile.

    That works great to sync up the photos from the library as a batch.  But what happens when you add a new employee photo to the library?  We need something to automatically update the MySite user profile, and a custom workflow will do just that.

    Here’s the general logic for our workflow:

    When an item is added or updated,

    1. Check if a User Name has been set.  If so, 
    2. Retrieve the User’s Profile
    3. Set the ‘PictureUrl’ value to the Url of the item in the picture library.
    4. Save the Profile record.
    5. Regenerate the Thumbnail sizes used by MySites.

    Unfortunately, out of the box, SharePoint Designer workflows will not allow you to manipulate the User Profile.  I made an attempt to use the Virto Software Workflow Activities add-on, but was not able to get it working as I expected.  (UPDATE: This may have been a permissions issue. YMMV)

    So, we need to use a Visual Studio Sequential Workflow in order to get full access to the User Profile.  Here are the steps.

    First, create a new Sequential Workflow project in Visual Studio and go through the wizard

    01_NewProject

    02_ProjectWiz-1

    03_ProjectWiz-2

    04_ProjectWiz-3

    05_ProjectWiz-4

    Next, with the Workflow Designer open, select a ‘Code’ element from the Toolbox and drag it on to the workflow after the onWorkflowActivated1 event.

    06_WorkflowToolbox

    View the Properties for the Code element, and set the ExecuteCode property to “UpdateUserProfilePhoto”.  This will stub out a new method for you in the code file.

    07_SetExecuteCode

    Now, add the following references to your project:

    • Microsoft.Office.Server (14.0.0.0)
    • Microsoft.Office.Server.UserProfiles (14.0.0.0)
    • System.Web (2.0.0.0)

    08_AddReferences

    In your workflow code file, add the following using statements

    using Microsoft.Office.Server.UserProfiles;
    using Microsoft.SharePoint.Administration;
    using System.Web;

    And then add this code to the UpdateUserProfilePhoto method to implement our workflow sequence.

    private void UpdateUserProfilePhoto(object sender, EventArgs e)
    {
      try
      {
    
        //get username
        Microsoft.SharePoint.SPFieldUser fieldUser =
         (Microsoft.SharePoint.SPFieldUser)workflowProperties.Item.Fields.GetField("User Name");
    
        Microsoft.SharePoint.SPFieldUserValue fieldUserValue =
          (Microsoft.SharePoint.SPFieldUserValue)fieldUser.GetFieldValue(workflowProperties.Item["User Name"].ToString());
    
        if (fieldUserValue != null)
        {
          string username = fieldUserValue.User.LoginName.ToString();
    
          if (!string.IsNullOrEmpty(username))
          {
    
            //get profile record
            using (SPSite site = new SPSite(workflowProperties.SiteId))
            {
              SPServiceContext context = SPServiceContext.GetContext(site);
    
              UserProfileManager profileManager = new UserProfileManager(context);
    
              UserProfile profile = profileManager.GetUserProfile(username);
    
              //Updates values
              profile[PropertyConstants.PictureUrl].Value = workflowProperties.Item["EncodedAbsUrl"].ToString();
    
              //commits changes
              profile.Commit();
    
            }
          }
        }
      }
      catch (Exception ex)
      {
        //write to ULS
        SPDiagnosticsService diagSvc = SPDiagnosticsService.Local;
    
        diagSvc.WriteTrace(0, new SPDiagnosticsCategory("Workflow", TraceSeverity.Monitorable, EventSeverity.Error), TraceSeverity.Monitorable,
          "Error in Save User Profile Photo workflow: {0}", new object[] { ex.Message.ToString() });
        diagSvc.WriteTrace(0, new SPDiagnosticsCategory("Workflow", TraceSeverity.Monitorable, EventSeverity.Error), TraceSeverity.Monitorable, 
          "Error in Save User Profile Photo workflow: {0}", new object[] { ex.StackTrace.ToString() });
      }
    }

    Note that there are some slight variations between this code and the Powershell script, namely in the Encoded Absolute Url property name, and the property used to get the username value.

    The workflow is now ready to be deployed, so you can update the Feature and Package to your liking.

    There is one more crucial task in order to make this work, and that is to grant permissions for modifying the User Profile to the Application Pool service account for the web application in which this workflow will run. If you do not do this, you will receive the following exception when the workflow attempts to modify the profile record.

    Attempted to perform an unauthorized operation.
     at Microsoft.Office.Server.UserProfiles.UserProfileValueCollection.CheckUpdatePermissions()    
     at Microsoft.Office.Server.UserProfiles.ProfileValueCollectionBase.set_Value(Object value)    
     at SaveUserProfilePhoto.Workflow1.Workflow1.UpdateUserProfile(Object sender, EventArgs e)

    To grant this permission, go to the Manage Service Applications page in the Central Administration site. Select the entry for the User Profile Service Application, and click the Administrators button shown in the Ribbon.

    Add the application pool service account, then check ‘Full Control’, and save the changes.

    Running the Workflow

    To test the workflow out, we’ll add a new image to our Photo Library, being sure to select a person in the User Name field.  We also need to make sure we Check In the record, since workflow will not run on a checked out item.

    09_AddNewPhoto

    Clicking on the item and viewing its Workflow status will let us see if the Workflow ran successfully.

    11_WorkflowStatus

    Finally we can go to the user’s MySites profile page and confirm that the image is in place.

    10_MySitesProfileWithPhoto

    If the workflow code encounters any exceptions, they will be logged to the ULS file, so you can check there to see what happened.

  • How to Import user photos in to MySites profile

    I’ve come across several SharePoint installations where the HR department has used a Picture Library to store employee headshots.

    The frequent request is how to get those images on to the user’s MySites profile so they appear in search results and permissions lists. This post will walk through the process I used to pull the Image url from the Pictures Library and update the user’s profile using Powershell.

    Associate Picture Library record to a user name

    The first thing that is needed is a way to identify the Photo according to the employee. The simplest way to do this is by adding a ‘Person or Group’ column to the Photo Library Content Type. This column will let you use the People Picker to select their domain account, which is exactly what is needed to retrieve their MySites profile record.

    Add-Username-column

    Powershell Script

    The script is pretty straight forward.  Connect to the Picture Library, iterate through each entry, and for each one retrieve and update the User Profile record.  (The script below is adapted from what is found here.)

    The trick comes mostly from extracting the Domain user name from the column we just added.

    Add-PSSnapin Microsoft.SharePoint.Powershell
    
    #Site URL
    $mySiteUrl = "https://mysites.contoso.com/"
    #The picture library site/web Url
    $pictureLibUrl = "https://sara2.contoso.com/HumanResources/"
    #The name of the picture library 
    $pictureLibName = "Staff Photos"
    #The internal name for PictureURL property on Profile
    $profilePictureURLAttribute = "PictureURL"
    #The internal name for Login property on Profile
    $profileLoginAttribute = "AccountName"
    
    #Get site objects and connect to User Profile Manager service
    $site = Get-SPSite $mySiteUrl
    $context = Get-SPServiceContext $site
    $profileManager = New-Object Microsoft.Office.Server.UserProfiles.UserProfileManager($context)
    $profiles = $profileManager.GetEnumerator()
    
    #Get web object and connect to Picture Library
    $web = Get-SPWeb $pictureLibUrl
    $gallery = $web.Lists[$pictureLibName]
    
    write-host $gallery.ItemCount.ToString() "photo records found."
    
    foreach ($photo in $gallery.Items ) {
    	#get user assigment from column
    	$fieldUser = [Microsoft.SharePoint.SPFieldUser]$photo.Fields.GetField('User Name')
    	$fieldUserValue = [Microsoft.SharePoint.SPFieldUserValue]$fieldUser.GetFieldValue($photo['User Name'])
    
    	if ($fieldUserValue) {
    		$username = $fieldUserValue.User.UserLogin.ToString()
    		if ($username) {
    			#retrieve user's Mysites profile
    			$profile = $profileManager.GetUserProfile($username)
    			if ($profile) {
    				#$photo.url will contain the doc lib path
    				$newPictureUrl = $pictureLibUrl + $photo.Url
    				$profile[$profilePictureUrlAttribute].Value = $newPictureUrl
    				$profile.Commit()
    				write-host "User: " $username "PictureUrl: " $newPictureUrl
    			}
    		}
    	}
    }
    
    #clean up
    $web.Dispose()
    $site.Dispose()
    
    #create thumbnails in Mysites
    Update-SPProfilePhotoStore -MySiteHostLocation $mySiteUrl

    There are two main things to point out. First is using the SPFieldUser and SPFieldUserValue objects to pull out the domain name from the User Name field.

    #get user assigment from column
    $fieldUser = [Microsoft.SharePoint.SPFieldUser]$photo.Fields.GetField('User Name')
    $fieldUserValue = [Microsoft.SharePoint.SPFieldUserValue]$fieldUser.GetFieldValue($photo['User Name'])

    Second is that after you have assigned the Url to the User Profile and saved it, you must run the Update-SPProfilePhotoStore cmdlet in order to properly create the necessary thumbnail images used by MySites.

    #create thumbnails in Mysites
    Update-SPProfilePhotoStore -MySiteHostLocation $mySiteUrl

    Confirm Photo is on MySites Profile

    After running the script, you can confirm the photo assignment by either visiting the user’s MySites profile page, or by editing the profile in Central Admininistration.

  • Windows does have magic powers

    Windows does have magic powers

    I ran in to this error message today while trying to build a Visual Studio project.

    Magically-locked


    I guess I’ll have to track down my spell book or magic wand to get this unlocked so I can overwrite it.


  • Visual Studio 2012 has unexpectedly stopped

    Wow, what a mess.

    After installing Visual Studio 2012 Update 2, whenever I would launch VS2012, the start page would come up, and then the application would immediately crash.

    Simultaneously (and I suspect related) in Visual Studio 2010, when I would try to view the Team Explorer, all my team projects were showing with a nice big red ‘X’ on them.  I could not expand the project node, which means I could not get to any work items, or the Source Code Explorer.

    Also of note, an automatic Windows Update had taken the liberty of installing Internet Explorer 10.  Gee, thanks for that.

    After spending a full day trying to remove Visual Studio hotfixes, repair VS2012, rebooting (and more rebooting).  I was getting nowhere.

    I installed DebugDiag and tried to make sense of the crash dumps.  No smoking gun there.

    I googled for clr.dll and ntdll.dll and kernelbase.dll.  All red herrings.

    Then I tried to launch SQL Server Management Studio 2008 got this error:

    Unable to cast COM object of type ‘System.__ComObject’ to interface type ‘Microsoft.VisualStudio.OLE.Interop.IServiceProvider’. This operation failed because the QueryInterface call on the COM component for the interface with IID ‘{6D5140C1-7436-11CE-8034-00AA006009FA}’ failed due to the following error: No such interface supported (Exception from HRESULT: 0×80004002 (E_NOINTERFACE)). (Microsoft.VisualStudio.OLE.Interop)

    Okay, this is a mess.  I would not have guessed that SSMS would have pulled in anything from Visual Studio, but there it was, plain as day.

    Looking for guidance on this error brought me to this blog post, which gave the following explanation:

    You would get above error if ieproxy.dll is not registered properly. Re register Ieproxy.dll.

    C:\Program Files\Internet Explorer>regsvr32 /u ieproxy.dll
    C:\Program Files\Internet Explorer>regsvr32 ieproxy.dll
    C:\Program Files (x86)\Internet Explorer>regsvr32 /u ieproxy.dll
    C:\Program Files (x86)\Internet Explorer>regsvr32 ieproxy.dll
    Following these steps threw errors on the /u calls, but showed success messages on the register calls.
    Big moment of truth – launching VS2010 and going to Team Explorer.  Fantastic!  Loaded without nasty red X.
    Bigger moment of truth – launching VS2012.  Opened and stayed open!
    And SSMS loaded up great as well.
    My guess is that either during the IE10 install, or the Update 2 install, or the dozens of other Windows Update hotfixes and security updates, that ieproxy.dll got either corrupted or unregistered without being put back in place.
    Now the task of adding back Update 2 and seeing if it is the problem or was just a victim of some other undoing.
  • Why are you lying to me Mr. Progress Bar?

    Why are you lying to me Mr. Progress Bar?

    As long as there have been computers that do work, there have been various forms for communicating progress to the user.

    I find these often to be a bunch of lying liars.

    When the bar fills up, the operation should be complete.  If it’s not, then don’t fill up the bar.

    Here’s the dialog that prompted this post. It is the installer of a Visual Studio update.  The bar is filled up, but clearly there is more work to be done.

    Web usability expert Jakob Nielsen writes about acceptable response times for actions done by a computer in his book published in 1993!

    In cases where the computer cannot provide fairly immediate response, continuous feedback should be provided to the user in form of a percent-done indicator [Myers 1985]. As a rule of thumb, percent-done progress indicators should be used for operations taking more than about 10 seconds. Progress indicators have three main advantages: They reassure the user that the system has not crashed but is working on his or her problem; they indicate approximately how long the user can be expected to wait, thus allowing the user to do other activities during long waits; and they finally provide something for the user to look at, thus making the wait less painful. This latter advantage should not be underestimated and is one reason for recommending a graphic progress bar instead of just stating the expected remaining time in numbers.

    To their credit, the Visual Studio team did provide a sprite so there was some motion while the installation took place.  But contrary to Nielsen’s suggestion, a filled up progress bar did not “make the wait less painful.”  It just plain irritated me.

    In the same way that developers should make their error messages meaningful, the status reported out to users should be useful and convey accurate information.


    Photo credit: https://www.flickr.com/photos/jacksonmedeiros/2719799718/

  • April 2013 Cumulative Update for SharePoint 2010 breaks Add Web Part dialog

    April 2013 Cumulative Update for SharePoint 2010 breaks Add Web Part dialog

    For a site running on SharePoint 2010, but still using the 2007 user experiences (also known as UIVersion = 3), the April 2013 Cumulative Update for SharePoint 2010 causes the Add Web Part dialog page to break in Internet Explorer.

    After applying the CU, the dialog does not properly resize to display all the available web parts.

    add-web-part-broken

    This problem only occurs in Internet Explorer.

    After reviewing all the Javascript on the page and master page that is supposed to calculate and resize the display, I remembered that the CU had been recently installed.

    Sure enough, when I compared the files to ones on a server that had not received the CU, the files were different.

    Here’s the file from Service Pack 1

    picker-dialog-pre-CU

    And here it is from April 2013 CU.  Based on the file date, it may have actually been the February 2013 CU that introduced the change.

    picker-dialog-post-CU

    To see what exactly had changed, I used Notepad++ to compare the two files.

    picker-dialog-compare

    As can be seen, the 2013 file (on the left) had a new meta tag added to force the display mode for Internet Explorer.  It appears that this caused IE to misreport the content height while resizing the dialog.

    Simply commenting out the extra meta tag allowed the dialog to resize properly in Internet Explorer.

    add-web-part-fixed

    For SharePoint 2010 sites using the 2010 User Experience (that is, UIVersion = 4), this is a non-issue since the Add Web Part selector is part of the ribbon, not in a dialog window.

  • Upgrading a MacBook Pro with an SSD

    Upgrading a MacBook Pro with an SSD

    One of the relatively cost-effective methods for extending the useful life of a computer these days is to upgrade to a Solid State Drive.  By eliminating the physical spinning disc and its latency, an SSD provides a noticeable boost to any desktop or laptop’s performance.

    I elected to do a clean operating system install on the SSD rather than cloning my existing drive.  I used a USB-to-SATA external enclosure to mount the SSD.  From there, I ran a clean install of OS X Mountain Lion and selected the external drive as the destination.  I confirmed the OS install by booting from the USB drive and everything came up fine.

    Then it was time for the physical install of the SSD into the MacBook Pro.

    You will need:

    • a very small Philips screwdriver.  In my case, the External enclosure came with one that worked great.
    • a small Torx driver.  This is used to remove the ‘lugs’ that are installed on the drive itself.  I didn’t have a Torx driver small enough, so was able to use needle nose pliers to gently remove and install the lugs.

    I recommend a good open workspace with plenty of light.  The screws involved are quite small and would be easy to misplace.

    First, flip the MBP over and carefully remove the 10 screws that hold on the bottom panel.  These are not all the same length, so keep track of which hole they go in to.

    IMG_9767

    Carefully lift of the bottom cover.  As you can see in the picture, there was plenty of dust to be cleaned up.  Be gentle.

    IMG_9768

    The hard drive is in the lower left, and is held in place by a plastic ‘bar’ along the top edge of the drive.  This bar is held in place by 2 more screws.  Note: these screws won’t come all the way out, so just get it loose and gently lift off the retaining bar.

    IMG_9769

    After removing the retaining bar, pull on the plastic tab to pivot the hard drive towards you.  Slide the drive up and out, being careful of the power/SATA cable that runs underneath it.  As soon as you are able, disconnect the power/SATA connection.

    IMG_9770

    With the old drive free, you’ll see 4 lugs on the edges of the drive, one in each corner.  These lugs need to be transfered to the new drive.  Use a Torx driver (or small pliers) to remove them from the old drive and put them on the new one.

    IMG_9771

    After the lugs are in place, connect the power/SATA cable to the new drive, and place the drive into the bay.  Tip it up, get the lugs under the lower retaining bar, then settle it in to the upper retaining bar.  Finally, replace the top retaining bar and tighten the screws down.

    IMG_9773

    Finally, replace the bottom cover and get all the screws in place.

    Since I had already gone through the Mountain Lion first load sequence, my first boot with the SSD went right to the login screen.

    I don’t have any particular benchmarks, but the user experience is noticeably improved.  Overall load up of applications generally occurs within one or two bounces on the dock.

    For under $200, an SSD drive will easily add plenty of life to your hardware.  I don’t know what took me so long!

    (Let it be said too, I got SSDs for a 2006 era Dell desktop, as well as my wife’s 2009 MacBook and all three systems are performing great.)