As of late, I haven’t blogged much, but I’ve been continuing to look at Blazor and find ways to learn, build, and experiment with it. I must say, I really love Webassembly as a client-only platform.
So I built a utility app for myself, and all of the developers out there that end up googling a few basic tasks on a regular basis. I call it MyDev.Tools and you can check it out at https://mydev.tools
It’s April, 2020. Since mid-March we have been told to work exclusively from home. Schooling has moved to ‘distance learning.’ Statewide ‘stay-at-home’ orders have been issued across the country and beyond. This is COVID-19 and the new realities facing ours and every culture worldwide.
How do I respond? Build something.
Working from home isn’t new to me, but WFH with all my kids also in the house is a totally different dynamic. And with most of my workday spent interacting with my coworkers via web calls, the need for some aspect of privacy is more important than ever.
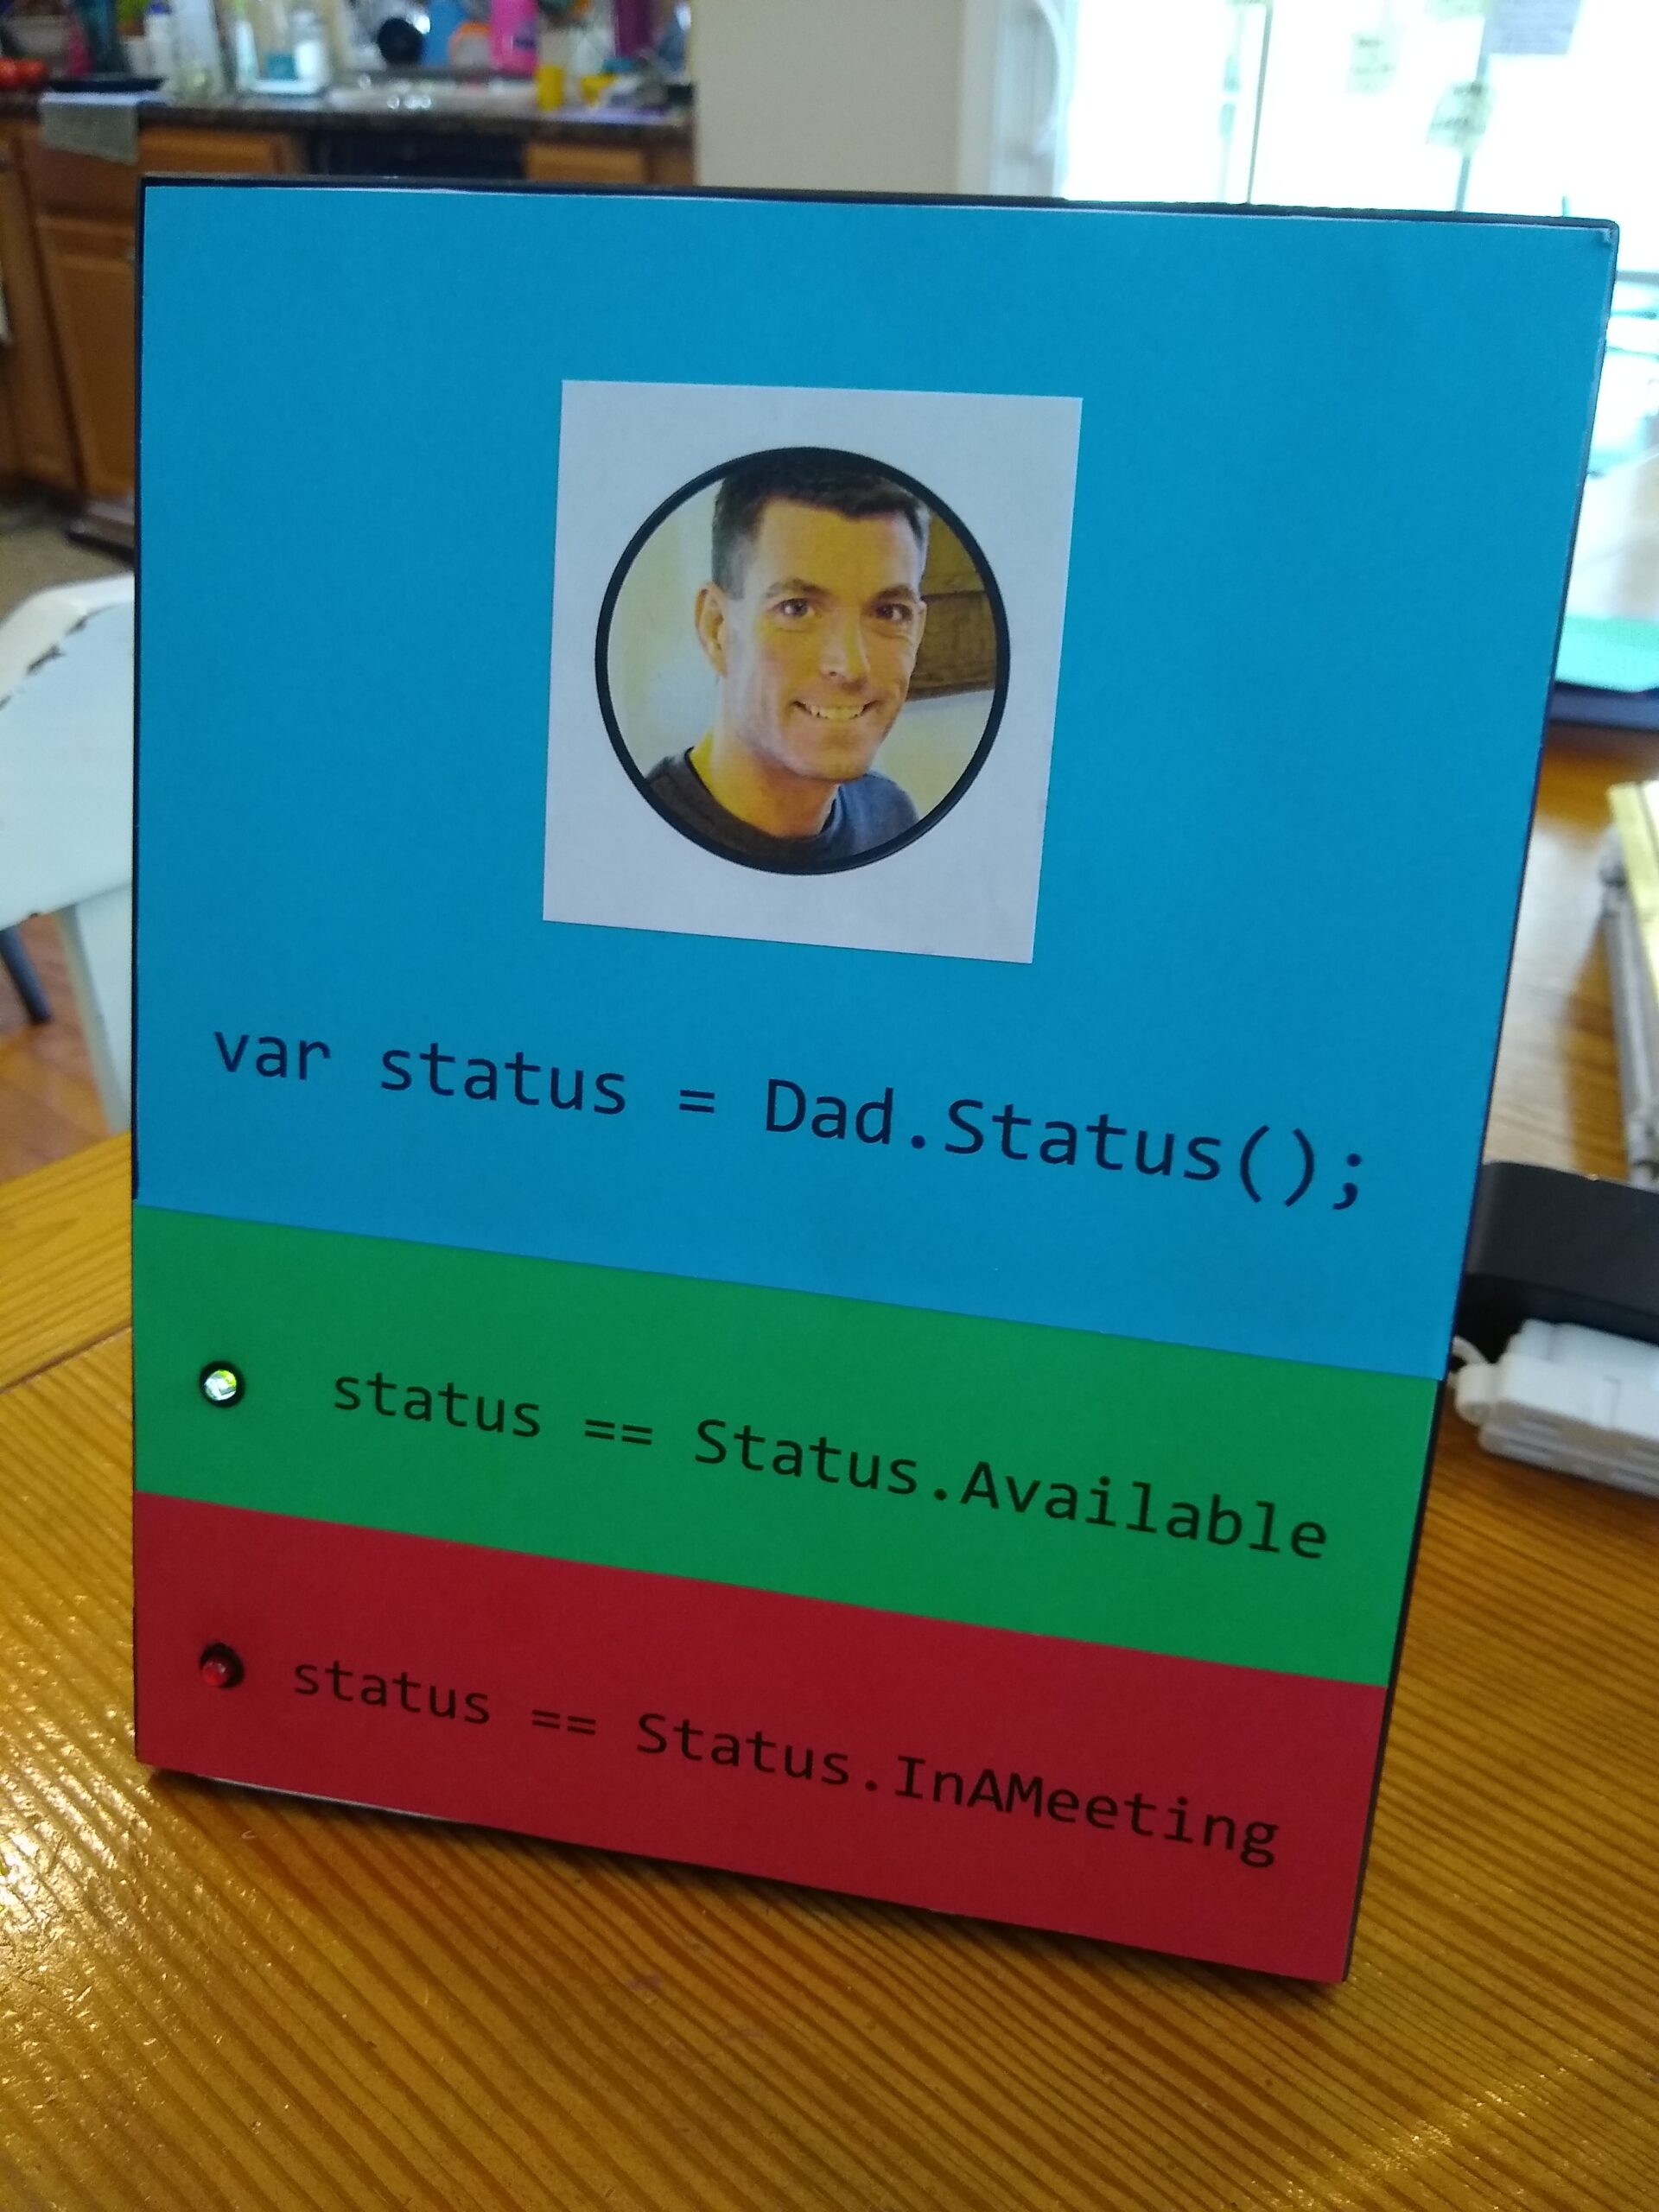
Hence, the Dad Status indicator.
A simple way to show my family whether or not I am available to solve their problem, hear their tale of woe about the terrible thing their sibling did, or make lunch.
The Dad Status Indicator (DSI) is a simple IoT rig using a Particle Photon and a couple colored LEDs. I also put together a quick web-app so I can toggle the status from my browser or phone.
Materials
Picture frame
foam core
colored card stock
1 Particle Photon
breadboard
1 RED LED
1 GREEN LED
LED holders
1 2.2k resistor
18 gauge wire
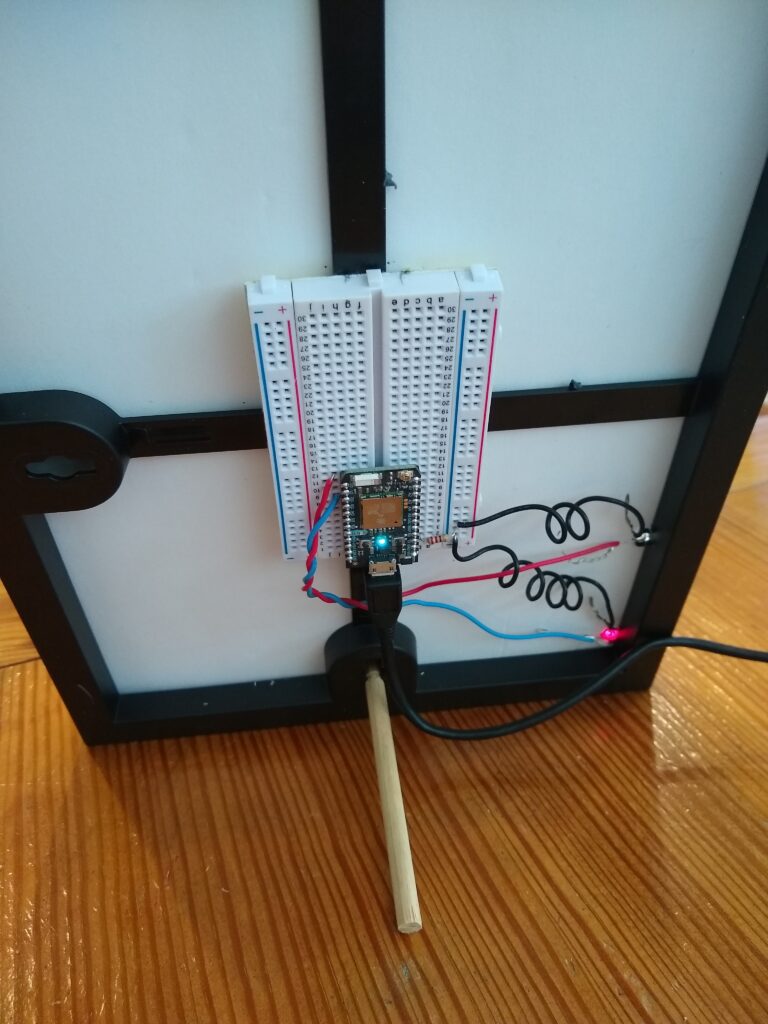
After printing the status message and text on to the card stock, I cut the foam-core to size to fit right in the picture frame. The card stock panels are then glued to the foam core.
I used a nailset to punch the holes through for the LEDs to be inserted.
There is no glass on the frame, mostly due to how the LEDs project out a bit.
Wiring
I used 2 digital pins on the Photon for the LEDs, and put the resistor inline with GND. Remember with LEDs the short leg is GND and the long leg is power.
Code
Particle is largely an event based platform, so subscribing to an event stream is pretty straightforward.
Subscribe
Here’s the Firmware code used to receive messages from the event topic and act accordingly:
// Daddy status indicator

int greenLed = D0;

int redLed = D3;

void setup() {
  #if defined(DEBUG_BUILD)
    Mesh.off();
    BLE.off();
  #endif

  // init pins
  pinMode(greenLed, OUTPUT);
  pinMode(redLed, OUTPUT);

  // subscripbe for events
  Particle.subscribe("daddy/status", statusHandler);

  // init status as available
  digitalWrite(redLed, LOW);
  digitalWrite(greenLed, HIGH);

}

// loop method not needed
void loop() {
}


// event subsription handler
void statusHandler(String event, String data) {
    if (data == "available")
    {
        digitalWrite(redLed, LOW);
        digitalWrite(greenLed, HIGH);
    }
    else if (data == "occupied")
    {
        digitalWrite(redLed, HIGH);
        digitalWrite(greenLed, LOW);
    }
}
Since the events are published using the Particle API, you do need to subscribe using the ALL_DEVICES parameter, and publish the event as a Public event.
More information about the Particle.subscribe() usage can be found on the Particle Docs site.
Publish
To publish the events, I’m using the REST API provided by Particle. You need to generate an access token (I used the Particle CLI tool for this) and include that in your API Post.
Here’s the bit of Javascript used to publish to the API
var available = 1;
var occupied = 0;

var apiUrl = "https://api.particle.io/v1/devices/events";
var token = "[[insert Particle access Token here]]";

function UpdateAvailability(state) {
    var data = {
        name: "daddy/status",
        data: state ? "available" : "occupied",
        private: "false",
        ttl: "60"
    };

    fetch(apiUrl, {
            method: 'POST', // or 'PUT'
            headers: {
                'Content-Type': 'application/json',
                'Authorization': 'Bearer ' + token
            },
            body: JSON.stringify(data),
        })
        .then((response) => response.json())
        .then((data) => {
            console.log('Success:', data);
            WriteSuccess(state);
        })
        .catch((error) => {
            console.error('Error:', error);
        });
}

function WriteSuccess(state) {
    var feed = document.querySelector("#messages");

    let newEl = document.createElement('li');
    newEl.classList.add('list-group-item', 'text-white');
    newEl.classList.add(state ? 'bg-success' : 'bg-danger');
    newEl.innerText = 'Status set to ' + (state ? 'available' : 'occupied') + ' at ' + new Date().toLocaleString();
    feed.prepend(newEl);
}
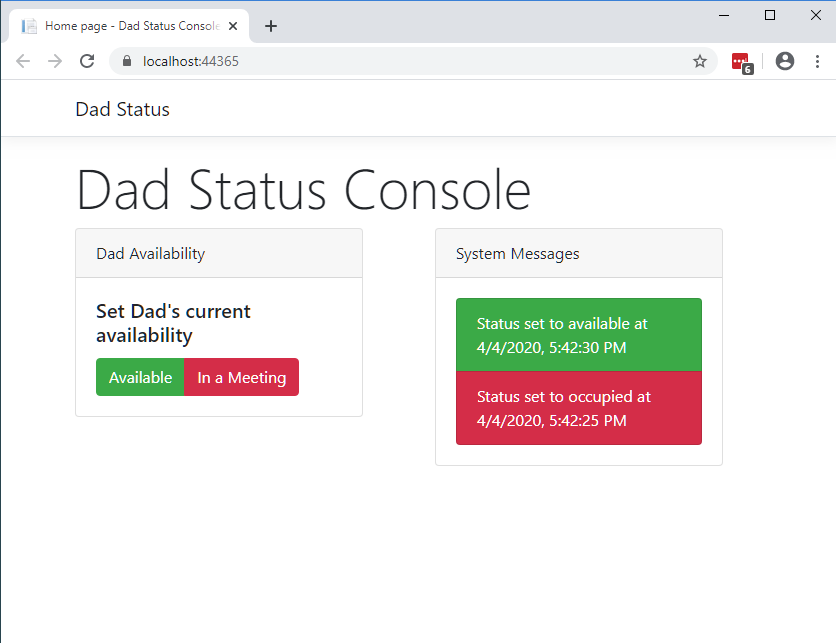
After each post, I am displaying a status message in a feed.
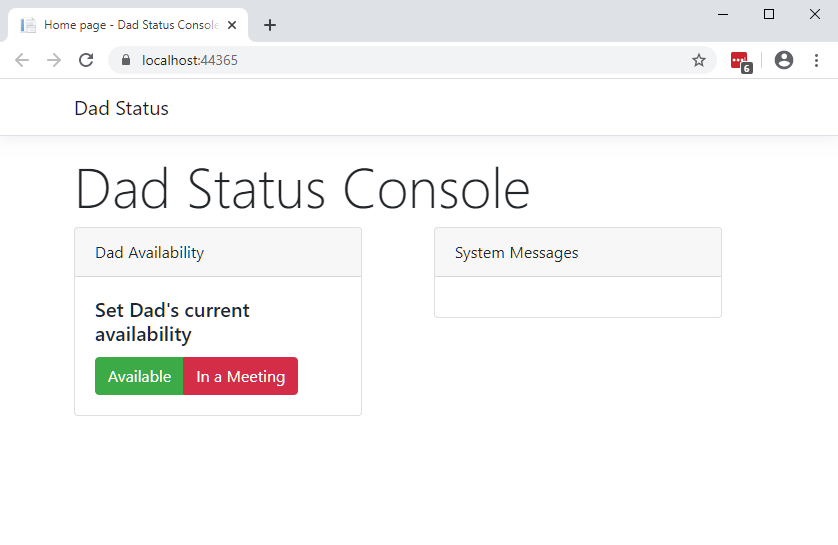
Web app
The web app is super simple. Just a couple buttons to trigger the post and a feed showing the history.
As the buttons are clicked you can see the message list update.
While working from home has been a normal for me for some time, the 2020 COVID-19 social distancing mandate has added another element to making my home office even more functional. This time around, I wanted to finally get a rig set up so that I could effectively use all four of the LCD monitors in my possession.
So, in the spirit of DIY and building things out of my favorite material – 3/4 in plywood – I set out to design a quad monitor stand that could sit atop my desk and fit under the shelving above.
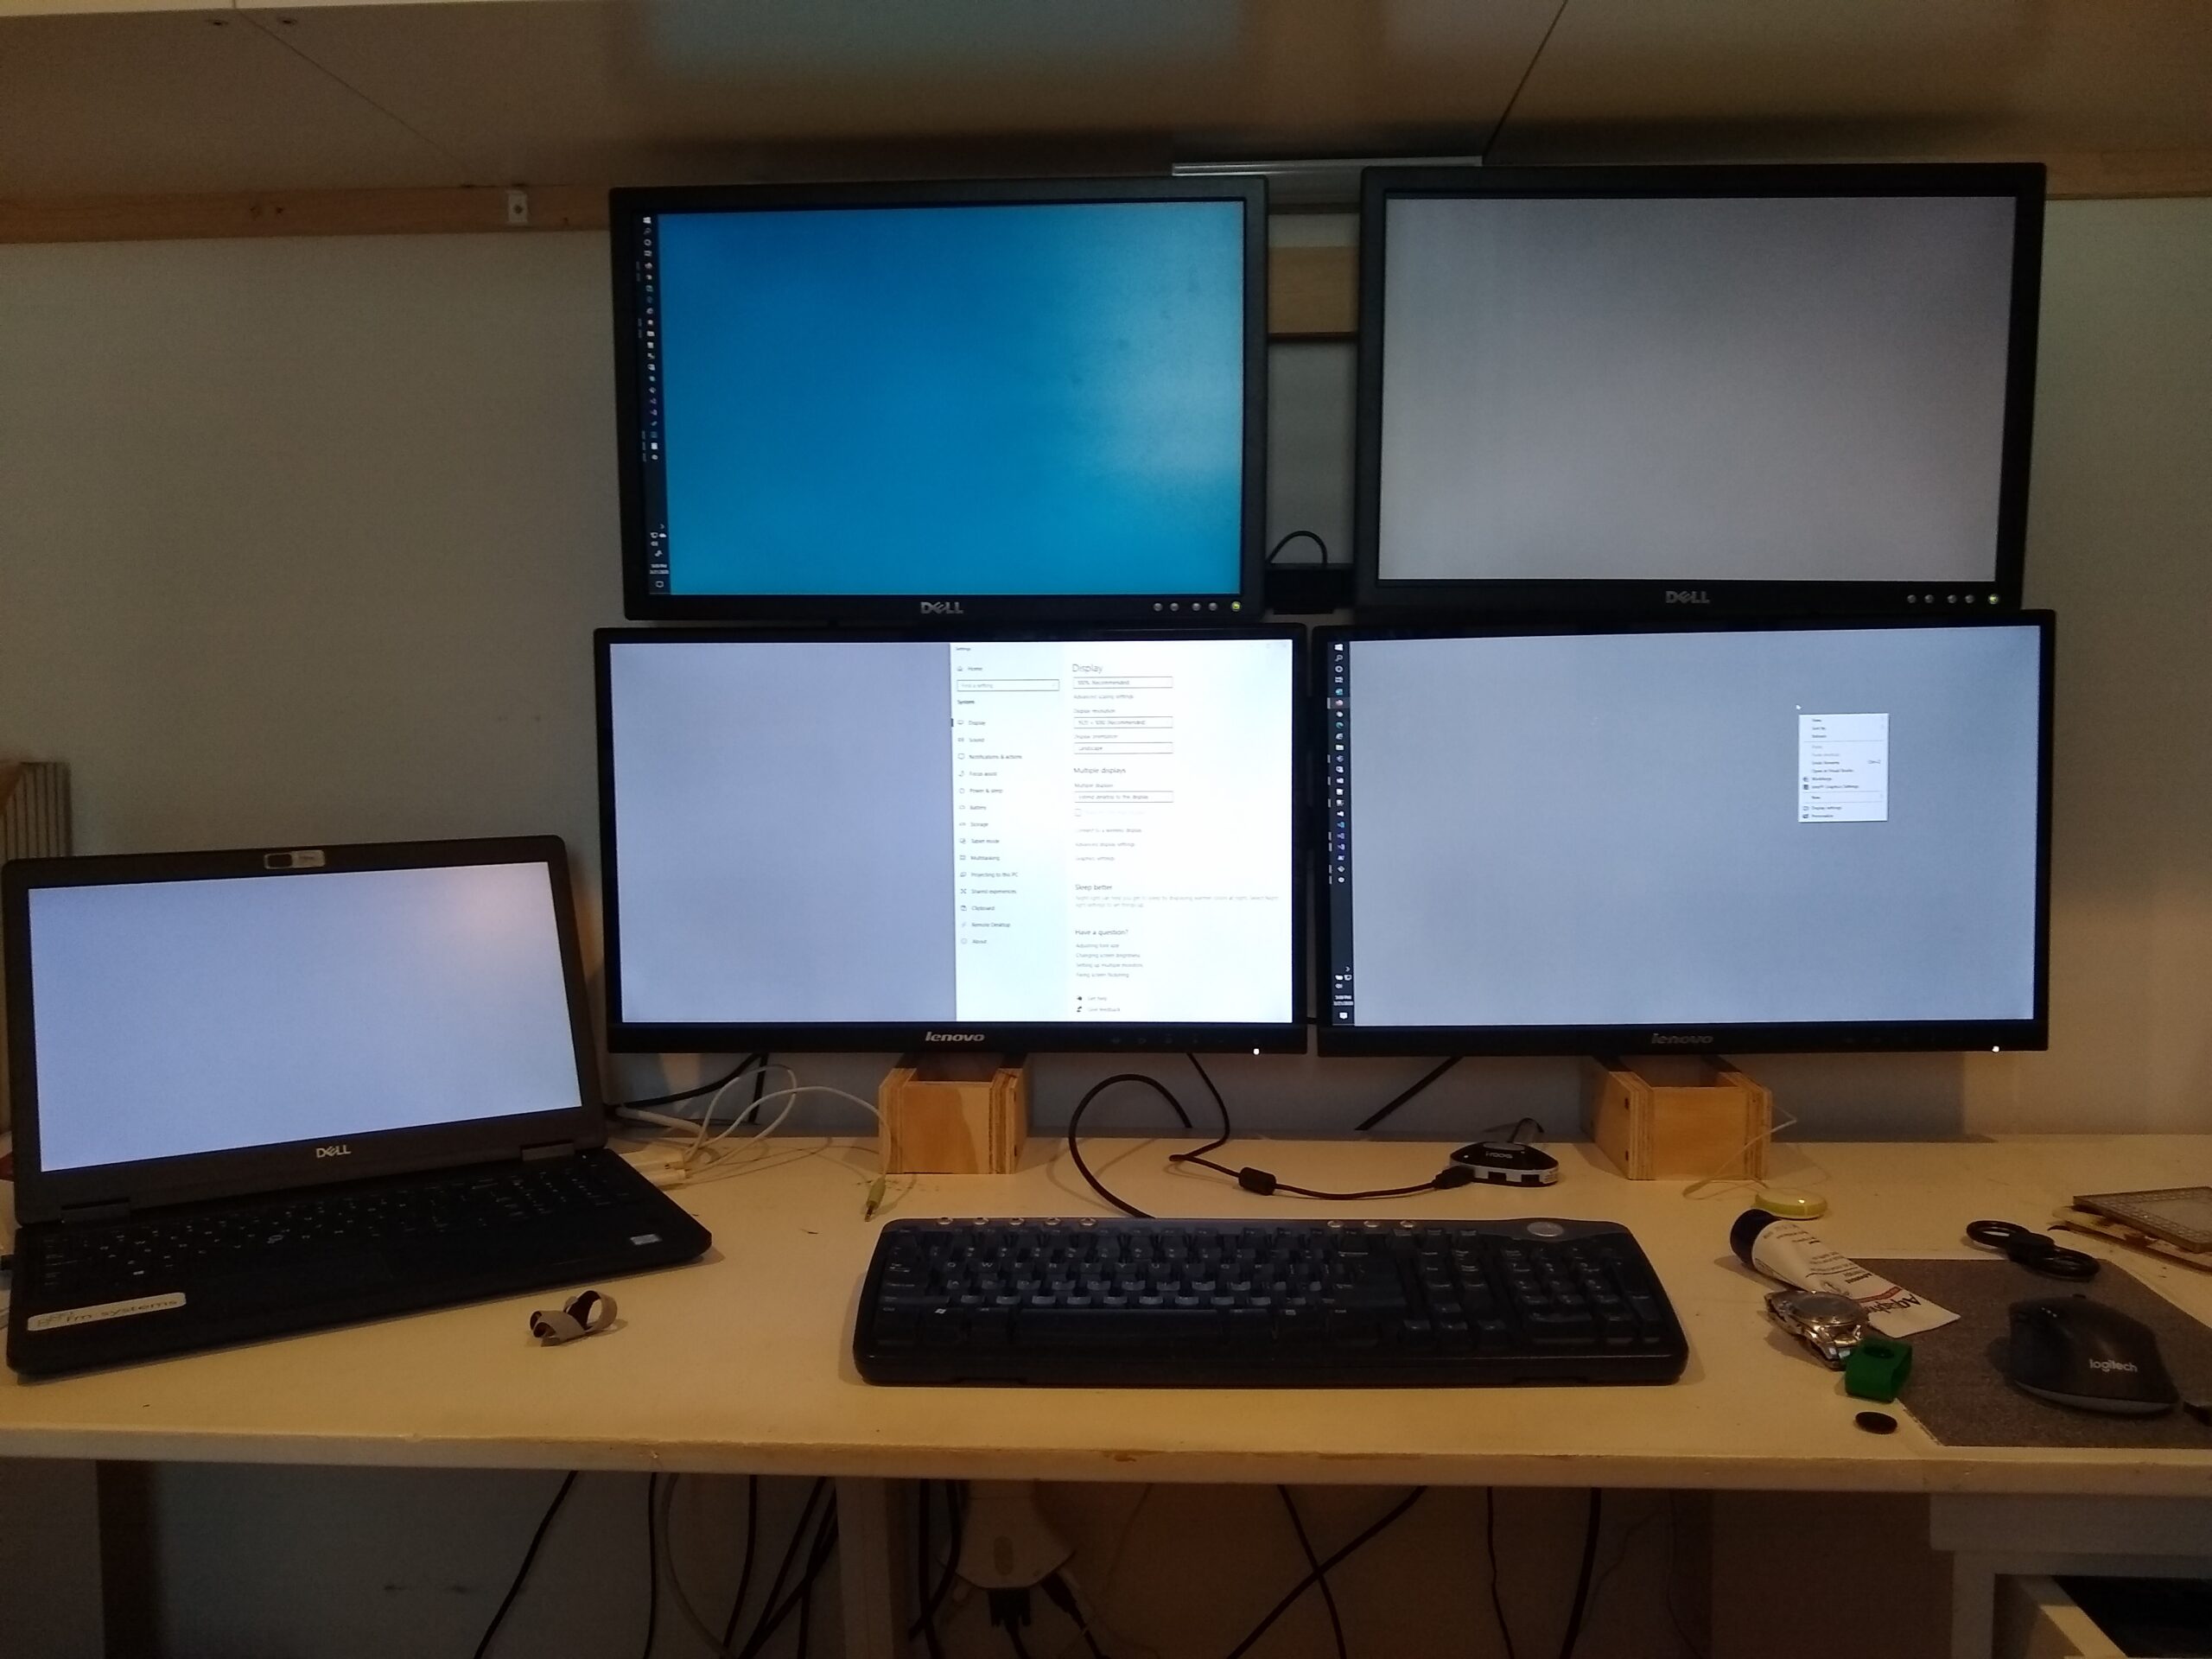
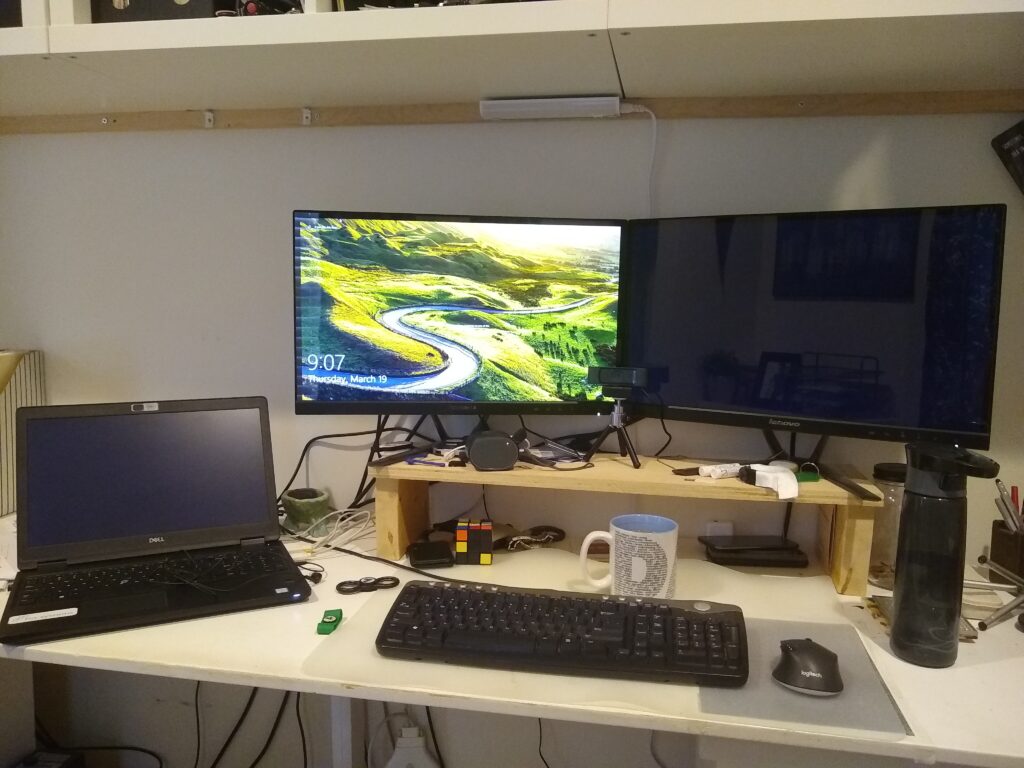
The Before Shot
Here’s how I was previously set up with only 2 monitors on a simple riser. Insert blanket “Please excuse the mess” comment here.
The total spacing between the desktop and the shelves about is about 29 inches.
Planning out the build
I looked at a lot of pre-fabricated and other DIY designs. Prices for 4-monitor stands online ranged from $50 to $100. There were a few 2 and 3 monitor designs I found that used black pipe. In the end, I went for a lattice type design rather than having a single central vertical component with horizontal ‘wings’. I suppose if I was using metal components that would work, but with wood I was worried the weight would be too much to support.
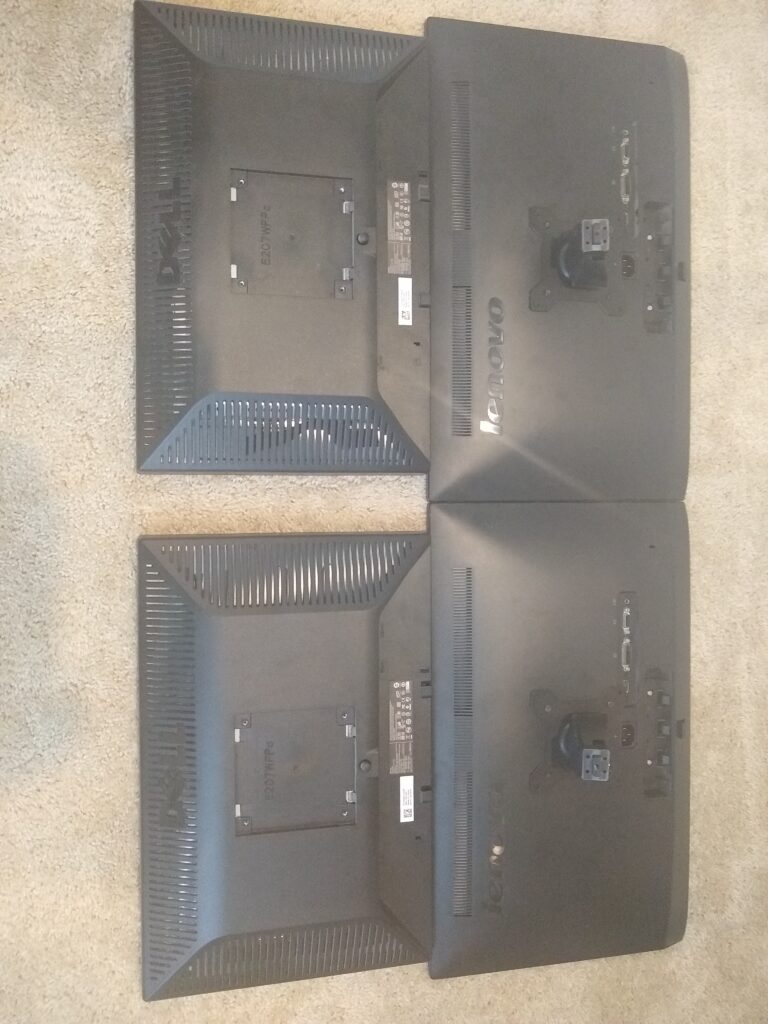
I began by laying out the monitors on the floor and taking measurements.
Since each pair of monitors was a different size, I aligned them on the mounting brackets. I was okay with the gap in the middle since I planned to have my webcam sit in that space.
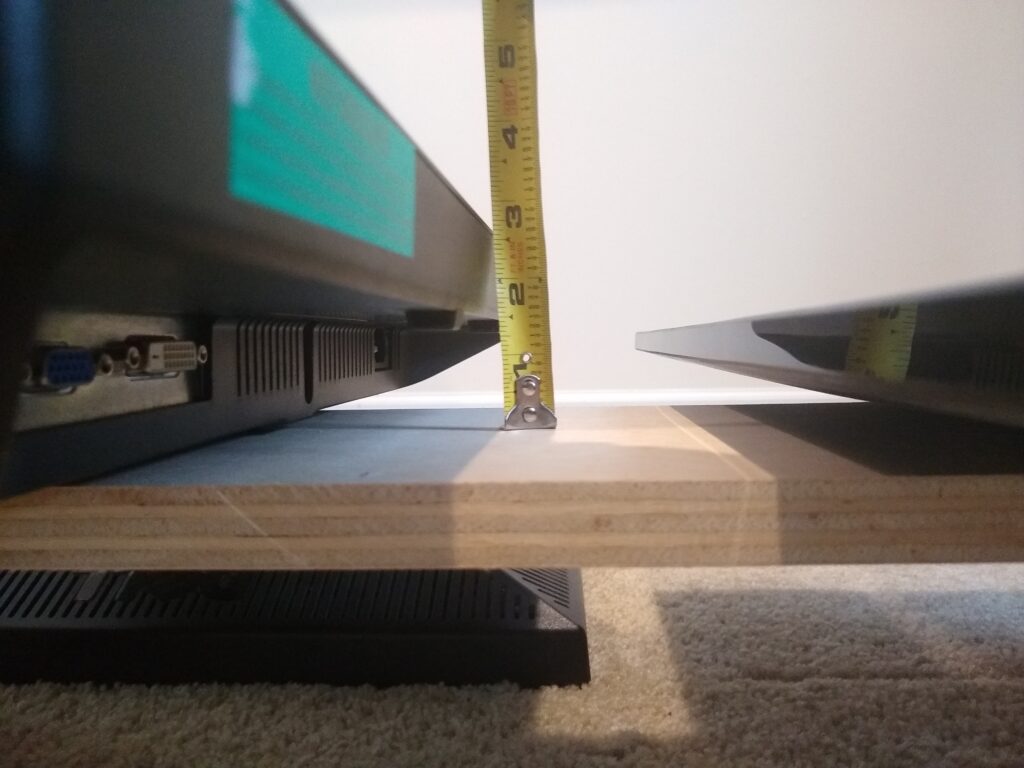
One thing I also had to consider (though in the end I did not make any adjustments) was that each set of monitors was a different thickness. The older monitors were a full inch thicker than the newer ones.
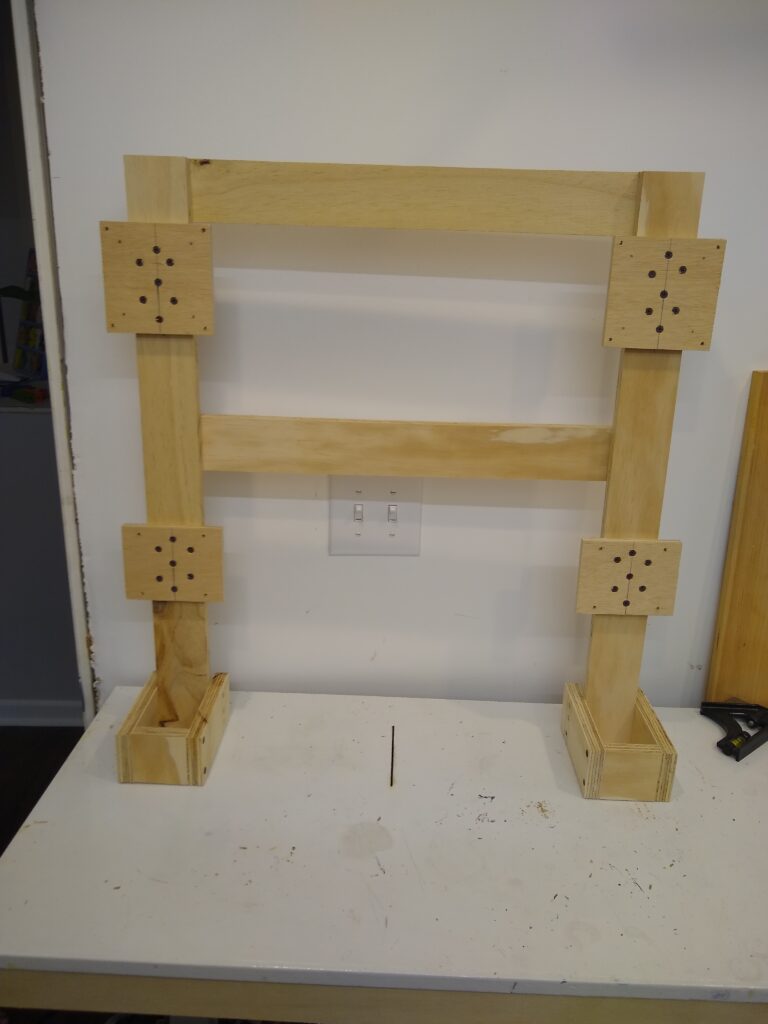
The Design
I decided to use 2 vertical supports aligned on the monitor mounting locations, connected with 2 horizontal pieces for rigidity. I would then simply add small feet to the base on each side to help the rig stand freely and not tip forward.
Here’s the cutlist I ended up with:
Dimension
Quantity
Vertical Support
3/4″ x 2 1/2″ x 27″
2
Horizonal Support
3/4″ x 2 1/2″ x 23 1/2″
2
Feet
3/4″ x 2 1/2″ x 6″
4
Feet Spacers
3/4″ x 2 1/2″ x 2 1/2″
2
Small mounting plate
1/2″ x 4 1/2″ x 3 1/2″
2
Large mounting plate
1/2″ x 4 1/2″ x 4 1/2″
2
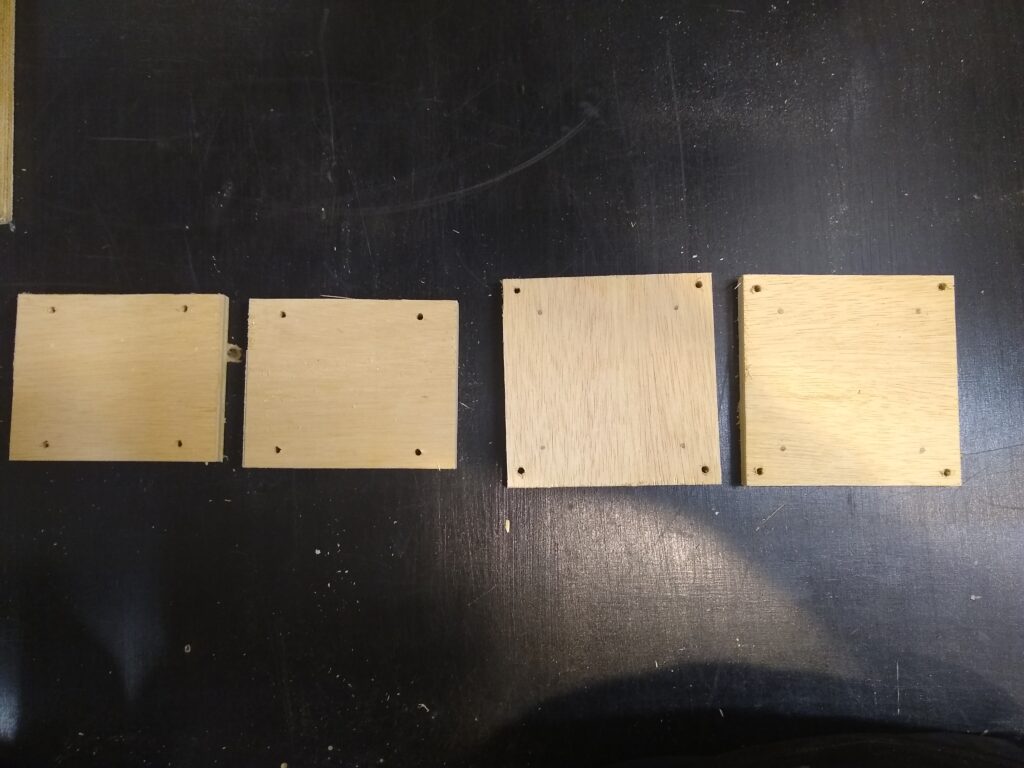
I made the monitor mounting blocks using 1/2″ plywood. I had a fabricated VESA mounting plate that I could use to transfer the screw placement on to these blocks.
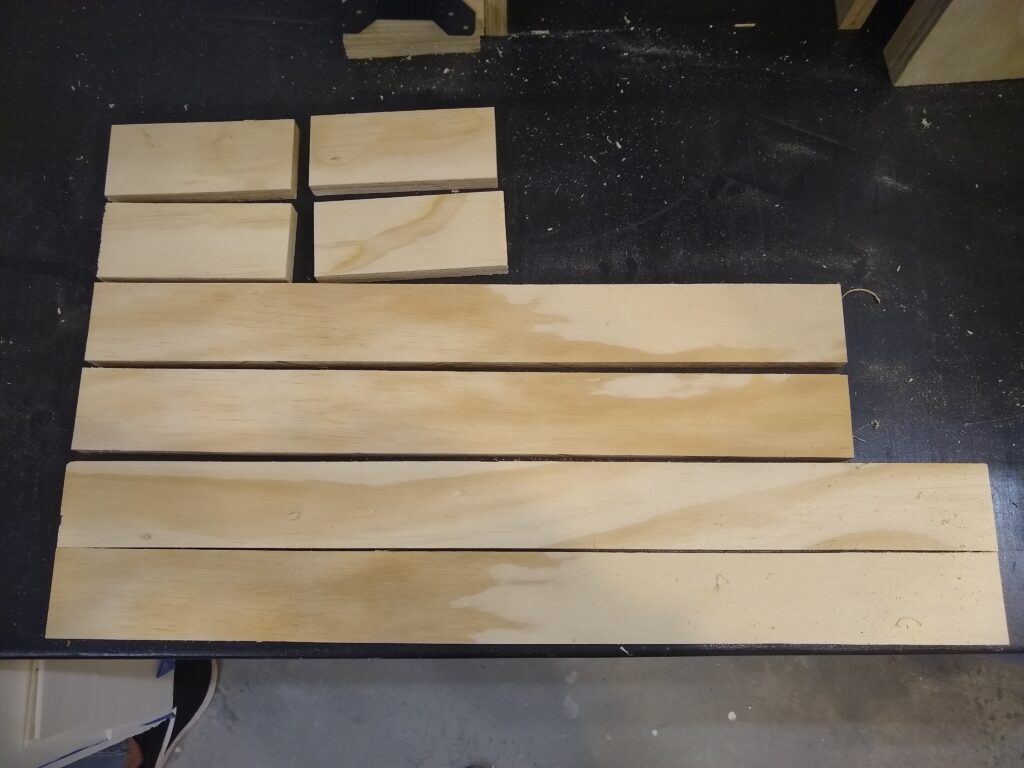
Using a table saw to rip down the plywood, a miter saw to cut length, and a drill to create the screw holes, I had all my components ready.
Mounting plates. Screw hold placement transferred from an existing mounting plate. Top: feet; Middle: horizontal supports; Bottom: vertical supports;
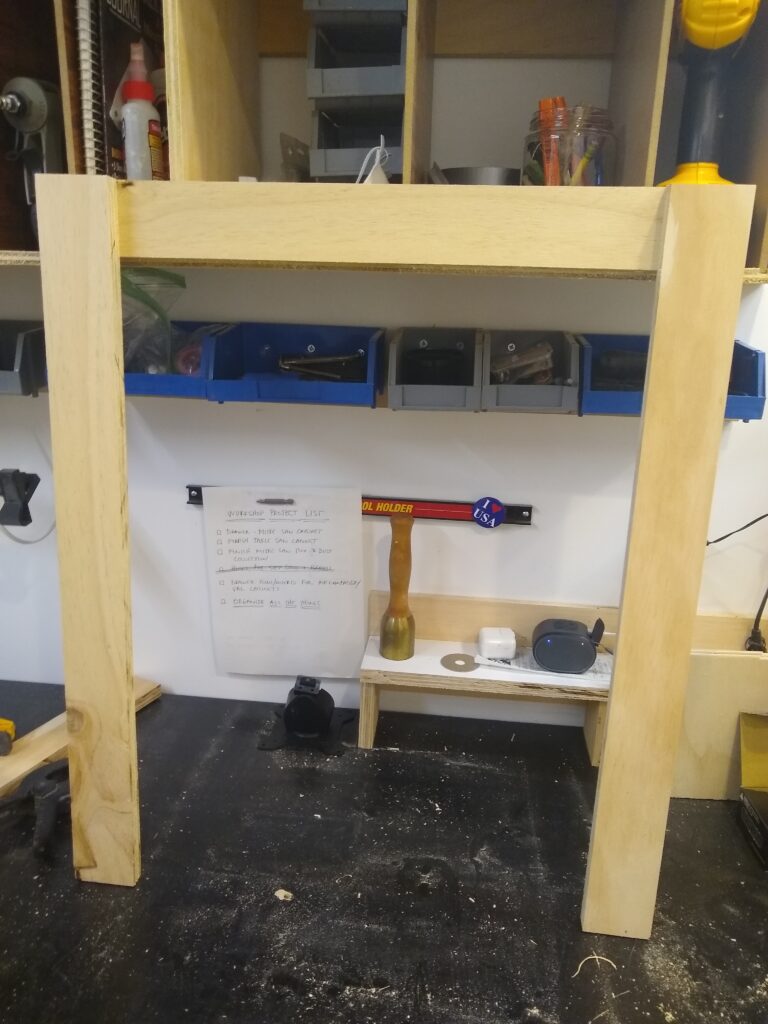
Assembly
Assembly was pretty straightforward, though I did a lot of dry fitting to check alignment with the actual monitors to make sure that everything lined up as expected. I also had to ensure the vertical placement of the mounting plates was correct so the monitors were not too high to fit under the shelves above my desk.
I used 1″ drywall screws to attach all pieces together. I chose not to use glue but it wouldn’t hurt to ensure the security of all the joints.
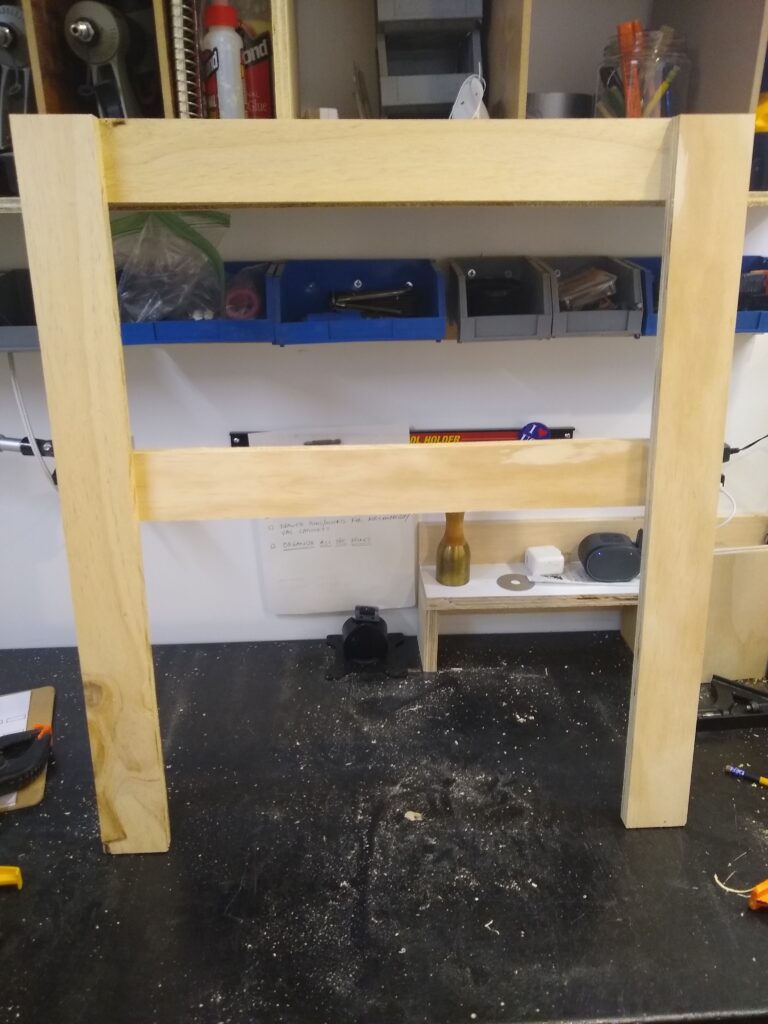
Initial setup of frameAdded second horizontal support after checking positioning against actual monitors.Mounting plates attached. I used additional screws here to account for weight of monitors.
To ensure the placement, I did another dry fit against the monitors to ensure the spacing and vertical placement was correct. In my case the lower plates are 7 3/8″ up from the bottom, and the uppers are 19 3/4″ up.
Feet attached
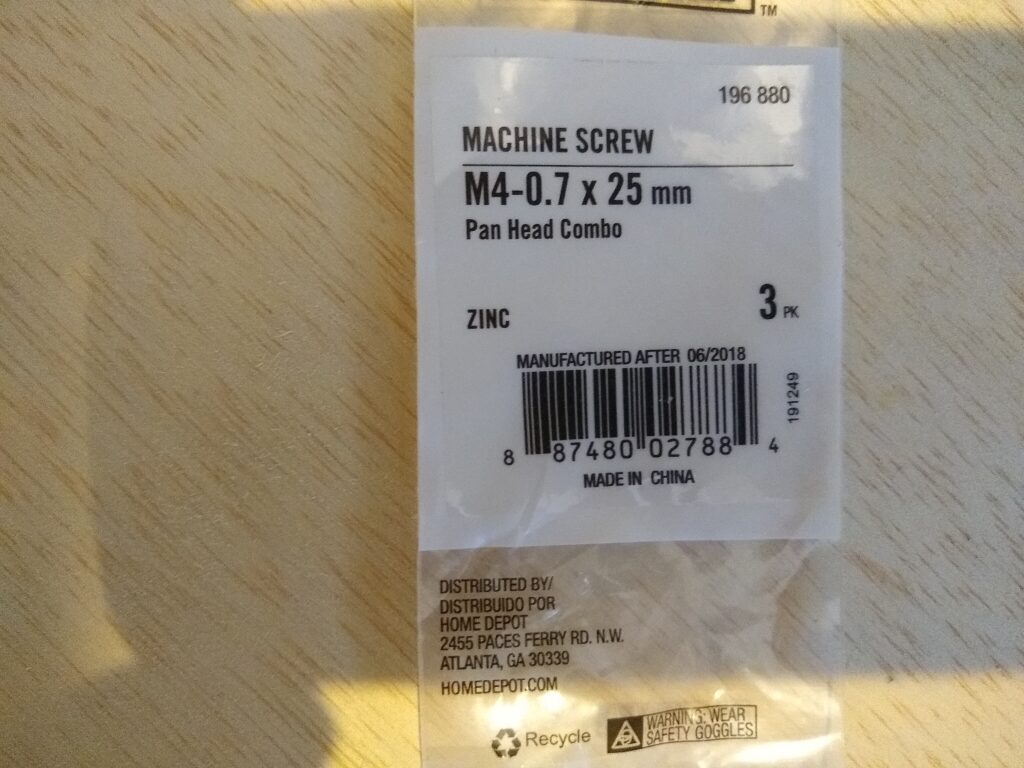
Hardware
I’m guessing it’s a universal standard, but the mounting screws used are metric with the following spec: M4-0.7.
At Home Depot I found both 25mm (about 1″) and 30mm (about 1 1/4″) length screws. These are not on the big racks of packets in the hardware aisle, but rather in the drawers with more specialized hardware.
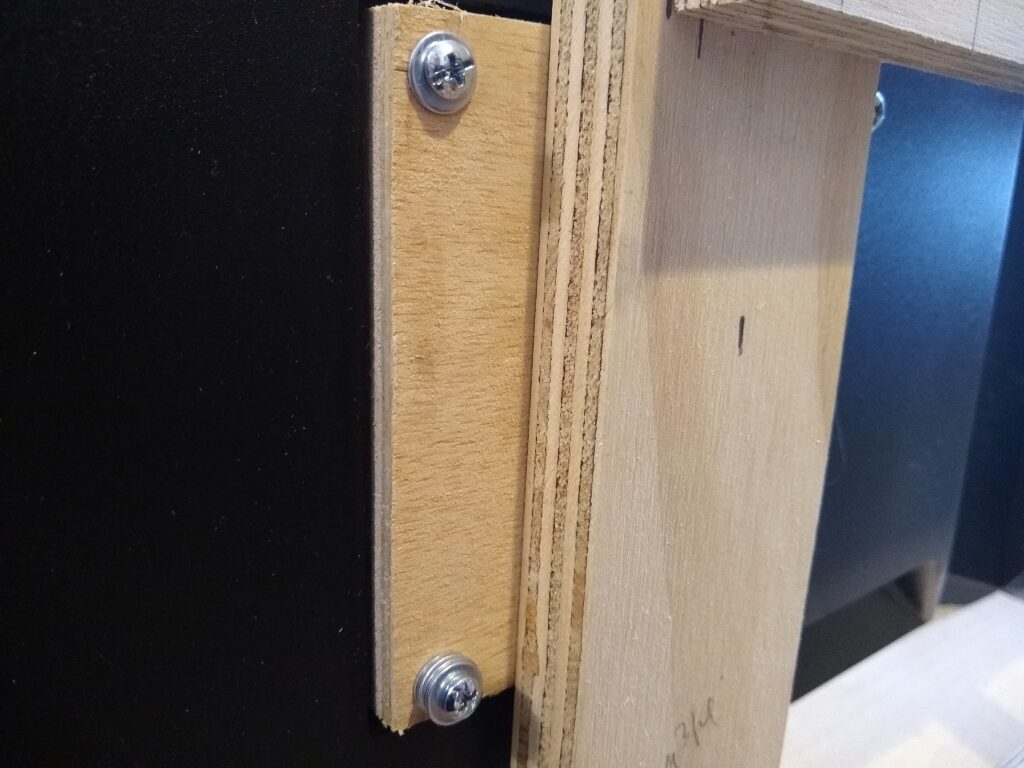
I also used small washers – and in the case of the 30mm screws, I used 5 washers to create a spacer.
Mounting the monitors was the moment of truth. Would the plates and screw holes all line up. Wow – got it on the first try!
Top is 25mm screw with 1 washer. Bottom is 30mm screw with 5 washers.
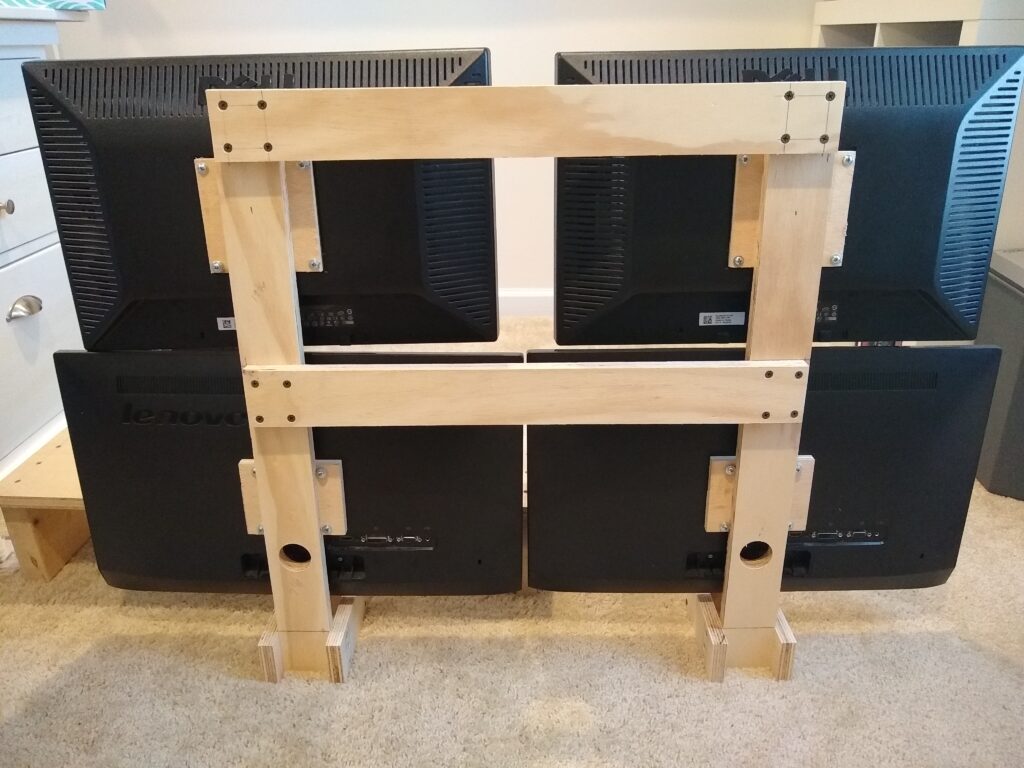
The After Shot
All monitors mounted beautifully. Notice the 1 1/4″ hole I had to drill in for the lower monitors. Some design genius at Lenovo decided putting the power cord outlet directly below the mounting plate was a good idea. This hole allows the cord to go directly in, and in the long run might be the only flaw or risk in my design since obviously removing 60% of my vertical support there weakens the integrity of the plywood. So far, though, it appears to be okay.
I also found that the mounting plate for the lower-left monitor appears to be slightly out of alignment (as shown by the clockwise misalignment in the gap between the top and bottom monitors.) I will need to adjust this slightly.
Here’s the final install on the desktop. I have 2 computers (desktop and laptop) so here’s the configuration I used to wire up each:
Laptop: HDMI out goes to lower left; USB-toVGA adapter goes to lower right; VGA out goes to KVM switch tied to upper right.
Desktop (has 2 DisplayPort outputs): DisplayPort-DVI #1 goes to upper left; DisplayPort-DVI #2 goes to upper right;
When I’m in work mode, I have the laptop driving 3 out of 4 monitors (shown with grey background), and only the upper-left one is displaying for the Desktop PC (with blue background.) I am using Mouse without Borders to create a seamless drag experience between all 4 monitors.
In non-work mode, I can have my Desktop PC drive the two upper monitors.
I am really satisfied with how this turned out. I spent about $5.00 on the hardware and used up several pieces of plywood scrap. Now, let’s get this WFH thing rolling!
One of the big changes in 2018 was taking a new job as Principal Software Engineer at FM:Systems. In this role, much more than my previous job as Director of a consulting division, I get to write code. Lots of code. Every day code and more code. It’s fantastic.
So Goal Achieved, right? Yes, but there’s more. Returning to a full engineering role has reminded me that there is so much out there that code can do, but also so much that needs practice and coaching. Coding, like any skill, can have both a certain muscle-memory, as well as atrophy when not exercised. So the practical application of Code More is to really focus on depth of knowledge with .Net Core and C#, as well as best practices for architecture, unit testing, and new things like Infrastructure-as-Code.
This Goal is a bit hard to measure per se, so my metric will be blog posts for things I’ve learned, tried, continue to need practice in, and success stories.
Eat like a vegan
For most of my life, I have dealt with a couple chronic health conditions, namely asthma and eczema. Over the past decade I’ve dabbled with a variety of what I’ll call non-medical solutions, including acupuncture, cutting out or minimizing certain foods, and supplements of all kinds. In short, nothing has moved the needle.
This past week, my wife and I watched Eating you Alive, a movie promoting adoption of a Whole Food Plant Based diet. Participants in the documentary told story after story about how giving up meat, dairy, sugar, and oils had dramatic impacts on their health, including reversal of cardiovascular conditions, cancers, and obesity.
Thankfully, I am in generally good health. I have been blessed (cursed?) with an ectomorph body type. My weight has been unchanged for 20 years. I feel good when I work out (as well as any 40 something, right?) and I’ve been spared any major health incidences.
But I don’t feel healthy. And clearly, as evidenced by my itchy red skin and wheezy congested lungs, there are some things, shall we say, out of whack!
Adopting a vegan diet is not going to make me happy. I have a real fondness for steak. I am probably addicted to sugar. But for at least a month at a time, I’m going to try. Here’s to kale in 2019.
To track progress on this goal, I don’t plan to write out my favorite recipes -but rather be an engineer about it. I’m working up a series of actual, measurable, health tracking values that I can monitor and report upon. Since redness in my face is my primary visible symptom, I’ve thought about taking pictures in a controlled location/environment, and using histogram data to track my actual appearance. More to come on that.
Build fun lamps as a hobby
All my life I’ve been a builder. I am comfortable working with my hands, I have a full workshop of tools, and in 2017 I took on the significant project of finishing my basement. However, like coding, I wanted to define some parameters around building that allowed me to really practice my skills. To that end, I have decided to build lamps.
Lamps are simple objects. But they can take unlimited form. They can be made of wood, pipe, or found objects. They can be upcycled, recycled, made out of uni- bi- tri-cycles. They can be classic or modern, industrial or country. Basically, there is no wrong answer.
They don’t know it yet, but my metric of this goal is to produce enough lamps during the course of the year to give as Christmas gifts to each of my family members. Parents + 2(siblings) + 2(inlaws) + wife + 4(children) = 10 creations. Roughly one per month.
I’ll use this blog to post my designs, and where appropriate, talk about the challenges or discoveries I made along the way for each one.
So that’s it! 2019 is planned and sized and ready for action. I’m excited to share my progress. Thanks in advance to those who might follow.
As has been noted on my blog bio (shown below) and my LinkedIn profile, I recently started a new job. Generally speaking, this isn’t Earth shattering news. People start new jobs all the time. In fact, among even the biggest tech firms, the average job tenure is just around 2 years. For me, I was at my previous employer for almost 8 years. Still, this was not a haphazard or spontaneous decision, and my reasoning, though unique to me, I think carries a few principles worth sharing.
For context, the job I left was as director of a division within a small professional services firm. The job I took is as a principal software engineer for a small but growing software product company.
I was ready for a new challenge.
Between 2001 and 2018, I have largely done professional services and consulting work. I worked for myself and as independent contractor for a time. I worked for the consulting arm within a larger software company. Then I worked for a pure professional services firm. In all of these contexts, the work was generally the same: find a customer with a business need, determine and design a software-based solution, then build that solution as cost-effectively as possible. These projects were almost exclusively billed by the hour, and had fixed (and typically aggressive) timelines to deliver.
Consulting is something I think I have particular skills at, but it is a uniquely constrained way of doing business. I found, whether working for myself, or working for someone else, that there is a big limit on freedom in this model. You end up only doing the work people hire you for, whether or not it’s using the latest tech, and you inevitably take technical shortcuts or skip over best practices in order to deliver within the terms of the budget. Consequently, after 17 years of operating in this model, I was craving a blue sky opportunity without many of the anchors that project-based, billable hours consulting intrinsically bring to the job.
That said, consulting is not all bad. The steady stream of new industries, customers, problems to solve, and yes, various constraints all serve to make you think differently and master the skills of problem solving. Learning and practicing task estimation and time management is key in any role.
So now, the new challenge is thinking like a product developer. Building features, not customizations. Working on a release schedule rather than a customer timeline. These are different types of problems to solve, and ones I happily confront. In short, I reached a time where I was ready to solve new challenges that were unfamiliar, rather than the ones I had seen repeatedly through my consulting career.
I wanted to catch a wave.
Part of my new role, and a large part of the corporate strategy of the company in which I am now employed, is embracing the Internet of Things. IoT is clearly the buzzword du jour in 2018, and it’s a wave I knew I would regret missing.
I am of a generation that graduated from university in the late 1990s, at the height of the dotcom bubble. My first job out of college, however, was not with a VC-backed startup, but rather in corporate IT. While I don’t regret taking a job at a more established company, not being part of that trend is something I’ve always held as a gap in my experience.
In 2007, when Apple released the first iPhone and largely started the smartphone revolution, I was starting a new job with a software company focused on web apps. I never leared xCode. I never really got engaged in mobile development, apart from various proof-of-concept apps or demos for presentations. This wave of development passed me over, and it’s something I’ve always been frustrated about.
In 2018, at the middle of my career, I was determined not to let another massive tech wave pass me by. My job search was consequently narrowly focused on companies building or adopting IoT solutions. I looked specifically for organizations that demonstrated a commitment to IoT as a core foundation, not a passing fad. And, thankfully, I found both.
I needed to refresh my skills.
While I have been a coder for nearly my entire career, professional services projects don’t always provide opportunities to write code. Further, many times, the code being written is not large enterprise systems, but one-off point solutions. Consequently, I found myself in a place where many of the coding skills (and habits, frankly) that I employed were due of a refresh.
This facet of the decision is largely what moved me out of a management role and back in to an engineering role. I wanted to get back to coding, and be able to apply my experience building systems in an environment that would force me to learn the techniques I lacked the opportunity to hone in my previous work. In fact, after only a few days on the job, interacting with members of my team and reviewing code others had written, I saw pretty quickly what areas I need to refresh. I built a learning plan, and have been able to get ramped up on the concepts. What’s more, is I now have bona fide work to do that allows me to apply these lessons.
Bottom Line: Don’t be afraid to jump
One of the hardest aspects of this career change was reaching a point where I could allow myself to make a choice for my own benefit, rather than worrying about the outcome or impact of me leaving my previous job. I needed to essentially be selfish. In that choice, though, I have been able to advance both my personal growth and career track. So if there is a lesson to take away, it’s that you are in control of your path, and you shouldn’t be afraid to cause disruption along the way.
Note: my hope too in this change is that I can renew my blogging habits. Look for new posts about IoT, Azure, and working on a great team.
SubmitForm is the simplest and uses databound fields.
Update() allows you to select and update a record (or records) with any values you want, either from your form or otherwise. But, if you don’t provide a value for a column, it will be blanked out. Not the greatest.
Patch() does a bit better than Update in that it will allow you to selectively update a single column and leaves all other values intact. However, you have to map every column you want to update, so if you have a record with lots of fields, you would have to set values for them all in your Patch() statement. Annoying.
So what I really wanted to accomplish was to set default values for my databound controls that may to the Approved and ApprovedBy fields, then use SubmitForm() to sweep up all the values and update the record.
Here’s the approach that worked, and properly passes the Current User through to the Person and Group field:
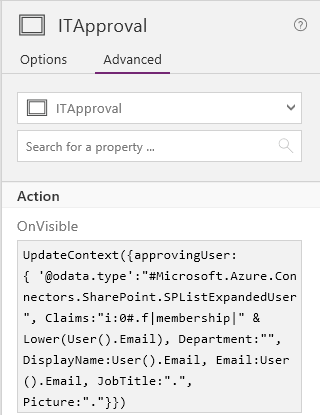
Set the OnVisible property of my Screen to set a Context Variable with a representation of the current User.
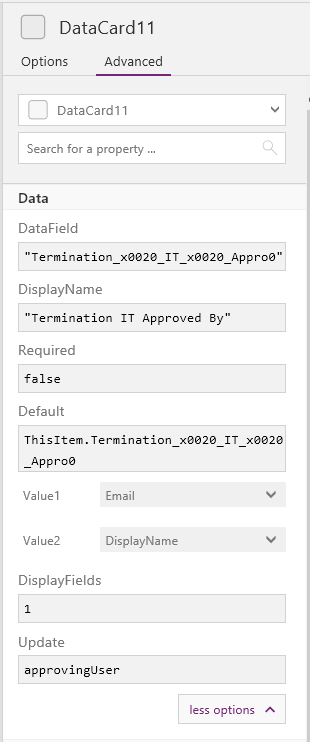
Add a DataCard for the Person field to my EditForm.
Set the Update property of the DataCard to the name of the Context Variable. This becomes the value passed by the SubmitForm() method to the column in my datasource.
Set the OnSubmit() property of my Save button to SubmitForm(FormName)
Set the Visible property on the DataCard to False so it is not shown on the form.
Let’s break this down first by looking at how the Person record is represented. PowerApps uses JSON style notation for objects. In this case, there is a special object for a SharePoint User object, as seen below:
If you’ve used SharePoint on-premise, then the formatting of the claims username may appear odd, but it works for Office365. If you are connecting to an On-Premise SharePoint data source using a Gateway, then this format may need to change for Windows Accounts.
From what I could tell, the Email property is the most important – even if the other properties (Department, DisplayName, JobTitle, Picture) are not populated, SharePoint will identify the correct user.
Be sure to use the SPListExpandedUser data type. There is also SPListExpandedReference (used for Choice fields) but it will fail when using a Person field.
You’ll get an error saying ‘A value must be provided for item’ if anything is incorrect.
So by setting a ContextVariable when the screen loads, I can then pass that object as the properly formatted value during the SubmitForm() call.
Once the variable is set, we then use it on the data card as the Update value
Things like this definitely make PowerApps a tool that requires some technical skills to achieve various business requirements. But as the product matures, I am hopeful that shortcuts will be implemented to make these common scenarios less cumbersome to address.
There are a lot of articles related to this error message, typically seen when trying to run an on-premise SharePoint provider-hosted add-in in a high trust configuration. I know because I read all of them.
For me, there was no (visible) evidence that the IssuerId in my web.config was different than the RegisteredIssuerName value of my Trusted Security Token Issuer entry. I checked and rechecked it dozens of times.
Finally I put some tracing in the the code to see what was actually being sent to the SharePoint. The creation of the authentication token is in the TokenHelper.cs class in the IssueToken method (about line 778). Line 796 is where it gets the issuer id value.
Here’s the screenshot of our trace log file reporting out the value being read from the web.config. Notice anything unusual?
There are some warnings related to cutting-and-pasting the Certificate Serial number picking up hidden characters – but somehow our entry in the web.config for the IssuerId also got a hidden character inserted in. The “??” is passed along as part of the issuer ID value and causes the mismatch.
I manually retyped the line in the web.config, saved, and reran the app. This time it came through clean with no errors simply because the values exactly matched.
By all appearances the values were the same, but the hidden character caused them to be different.
Add this to your checklist of things to review if you hit this error – hopefully it won’t take you several days like it too me and my team.
If you have created a custom page layout from Design Manager, it will have an .html extension. When this file is uploaded to the _catalogs/masterpage gallery, an event receiver will convert the file to a matching .aspx page layout.
However, I found a case where the .html file will not show in the Design Manager as you would expect.
I’ve been using the Patterns and Practices console application method for deploying branding assets, and it is a great way to push your branding related files up to a target SharePoint site. However, in the UploadPageLayout() method, it is assigning all files that are uploaded with the Page Layout content type.
If you use this against a .html file, it will upload fine, and will generate the .aspx file, but the .aspx will not be published, and the page layout will not be shown in Design Manager.
I’ve adjusted the SetPageLayoutMetadata() method as shown below to properly set the .html file with the Html Page Layout content type, which will allow it to be seen in the Design manager – as well as ensuring that the corresponding .aspx is published.
This past year I designed and built some automation for our backyard chicken coop. Here’s a video of me presenting the solution at the Raleigh Code Camp.
As someone who has been in the field you have selected for your career for some time, I hope you will allow me to offer some (completely unsolicited) advice about our industry. I’ve been where you are: eager, motivated, and hopeful. I’m sure you’ll encounter plenty of people who will have their own version of what I’m about to give you, but take them all together and just maybe something will carry with you in your career.
Do this job because you love it
Software developers like us certainly don’t corner the market on passion for our jobs. But with passion can come great results. I heard early on in my career the suggestion to “find something you love so much that you’ll do it for free, then become so good at it that anyone will pay you to do it.” These days (compared to when I was in your position) being a programmer is a lot more trendy and mainstream. Those who have passion will sustain – those who are just on the bandwagon will likely flutter off to some other interest.
Learn to communicate
Software is a unique product in that it reaches out to all levels of business and society. In your job, you’re inevitably going to encounter customers, managers, and clients who may be executives and directors. I’ve found that most of the time, particularly when things are not working as they should, these people want answers, not deep technical explanations. Consequently, you need to learn to communicate effectively to lots of different audiences.
One key element of learning to communicate is knowing how to balance discussion on technology and business. Since in most cases, business rules the day (see below) you want to be able to engage with someone about their business, and also explain technology and its capabilities for them. Sometimes this is as simple as asking “Would you like me to explain how this works?” rather than assuming they want to know.
Additionally, effective communication comes by knowing and understanding the perspective of your audience. If you are speaking to a business owner or department head, chances are they have a very bottom line view of the world, so you’ll need to learn how to discover those core values and then engage the person in that context. In general, I find you’ll be much more respected, well received, and more likely to be invited back to the table when people feel like you can represent technology without making them feel overwhelmed or lost.
Business rules the day
With extremely few exceptions, you are going to work for an business. That business is measured by a very simple equation: revenues minus expenses equals profit. Some organizations pretend that they are about other things, like serving people or changing the world. But in truth they are measured by money.
You will be hired to either increase revenues, decrease expenses, or facilitate both. These two objectives will drive every decision, every meeting, and every opportunity that you will face.
However, many of us (myself included) enter the industry without really understanding how business works. We arrive, eager to write code and make something, never thinking that every hour we spend stuck on an issue is costing the company something.
Therefore, I encourage you to get a basic education in business principles. Understand the core principles of accounting. Know how your employer keeps score, that is, what are the revenue centers, what are the cost structures, and how does your effort directly affect the bottom line. To that point – know what the phrase “bottom line” really is talking about!
You will inherit someone else’s code, and someone else will inherit yours
In my parent’s generation, a worker would often stay with one company for their entire career. In my generation, and likely for yours, this is no longer the case. If you are on the same project or with the same company for more than 3 years, you may be the exception. As such, the code you write and the code you are assigned will have lots of contributors to it.
I say this because inevitably, the code you inherit will suck. It will drive you crazy. It won’t make sense, and you’ll long to be inside the head of the person who wrote it just to figure out what the hell they were thinking. And then someone will feel exactly the same later on in life with the code you write. If there ever existed an unspoken courtesy among programmers, it should be to try to make life easier for the next developer on the project. This is at its simplest a longwinded way of saying “put comments in your code.” But in the same way you’ll appreciate receiving those explanations, the ones who inherit the projects you have worked on will thank you.
Learn to do things right, not just make them work
One of the most cringeworthy statements I hear from developers on my teams when they get faced with a problem is something along the lines of “I just had to hack something together…” Hack jobs are ticking time bombs. A great deal of technical debt in the world is the result of hack jobs, done in a hurry, because someone didn’t want to take the time to do it right. Resist this temptation as diligently as you can.
If you feel caught between a problem and a deadline – go petition for more time. Most managers and customers are reasonable enough to understand that a quick fix is often a seed that grows in to an expensive problem down the road. Learn how to communicate that risk.
Present a solution, not just a problem
Finally, as a manager, you need to understand that I’m busy. My day is full of lots of things. So if you get stuck or have a crisis, just telling me about it adds one more thing to my plate. Here’s the better way to do it:
If you have a problem or are stuck on something that needs your manager’s attention, come prepared to explain the problem to them but also present your solution. Let me know that you’ve put some thought to this. You can ask for either my clearance to go do your plan, or a validation that your plan is reasonable and feasible. But most importantly, demonstrate to your team or management your ability to solve the problem, and it won’t go unnoticed.
Being a developer is a great job. It’s fun, rewarding, and will provide you a good living. I know it has for me. Go forth and code!


![The issuer of the token is not a trusted issuer. [Beware of hidden characters]](https://codeovereasy.com/wp-content/uploads/2016/08/token-helper.png)


