Category: Featured

  • Lessons from my first radio interview

    Lessons from my first radio interview

    3165626090_da9b184819_bThis month I had the privilege of being a guest on a the Home Toolbox Radio show to discuss HomeSpot HQ and home maintenance in general.  Since this was my first experience I thought I’d share a few of my own “lessons learned”.

    Prepare your remarks, but don’t assume you’ll use them

    When we were coordinating the interview, it seemed appropriate to prepare some specific talking points.  I had a document ready that had questions and answers.  In reality, the interviewer conducted the discussion much more casually, and so the prepared answered were all but unused.

    Your involuntary verbal ticks will naturally come out

    In listening to the recording of the interview, I was embarrassed to hear how often I used the phrase “you know” as I gave my responses.  It is complete unconscious to me while I am speaking (you know?).  Try to prepare yourself to become hyper-sensitive to these phrases so that you will be able to catch yourself and minimize how frequently you say them.

    Find a good room

    Since the radio show was in Ohio, I called in as the guest.  Since I have children, the last thing I wanted was for one of them to burst in to the room and interrupt while I was on the air.  Solution?  I locked myself in the bathroom.  However, it may not have been a good choice given that it had both vaulted ceilings and lots of hard surfaces that create echoes.  The walk in closet may have been a better option since it was both smaller and the clothing would have helped reduce echo.

    Be confident

    Chances are you’ve been asked on the program because you’re considered an expert on the topic at hand.  When you boost your own confidence in your responses, they will come out clearer and more concise.

    You can listen to my radio interview below.

    Photo credit: https://www.flickr.com/photos/varresa/

  • April 2013 Cumulative Update for SharePoint 2010 breaks Add Web Part dialog

    April 2013 Cumulative Update for SharePoint 2010 breaks Add Web Part dialog

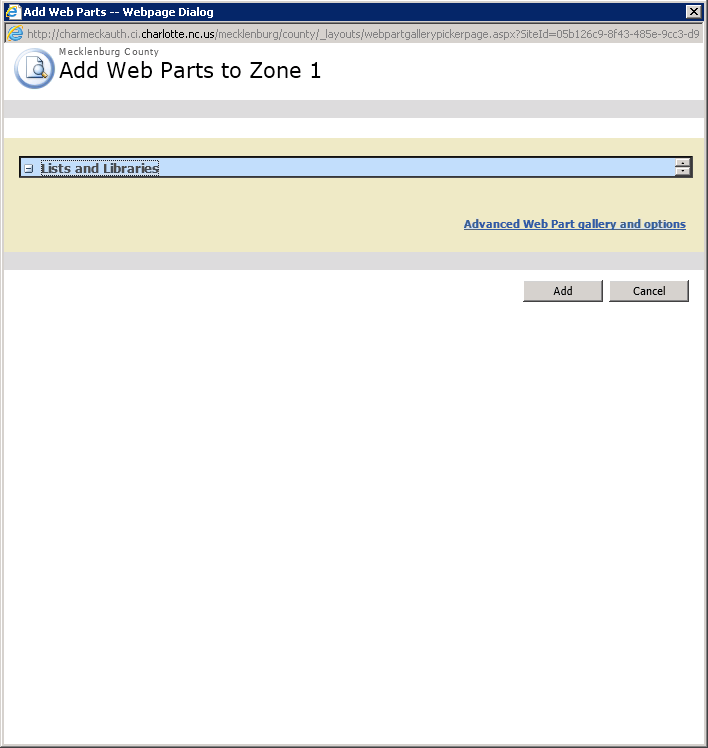
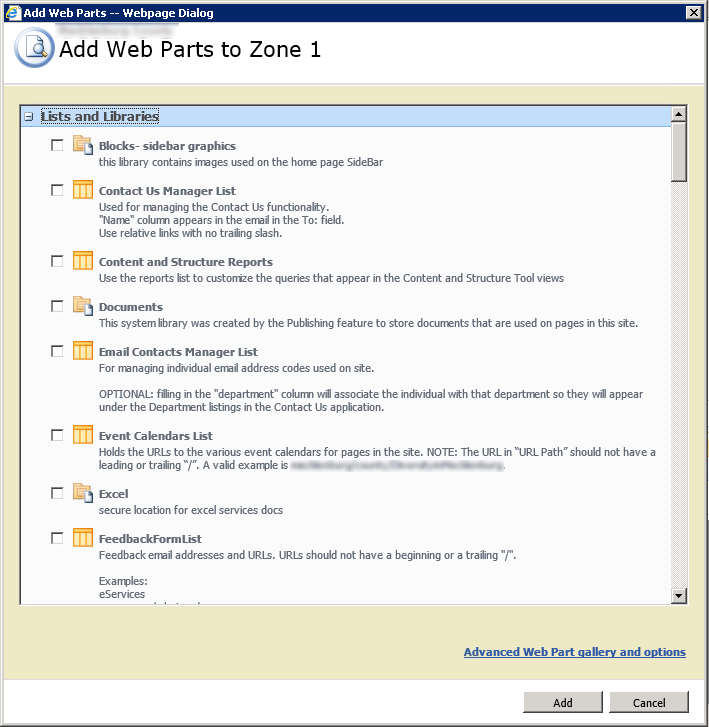
    For a site running on SharePoint 2010, but still using the 2007 user experiences (also known as UIVersion = 3), the April 2013 Cumulative Update for SharePoint 2010 causes the Add Web Part dialog page to break in Internet Explorer.

    After applying the CU, the dialog does not properly resize to display all the available web parts.

    add-web-part-broken

    This problem only occurs in Internet Explorer.

    After reviewing all the Javascript on the page and master page that is supposed to calculate and resize the display, I remembered that the CU had been recently installed.

    Sure enough, when I compared the files to ones on a server that had not received the CU, the files were different.

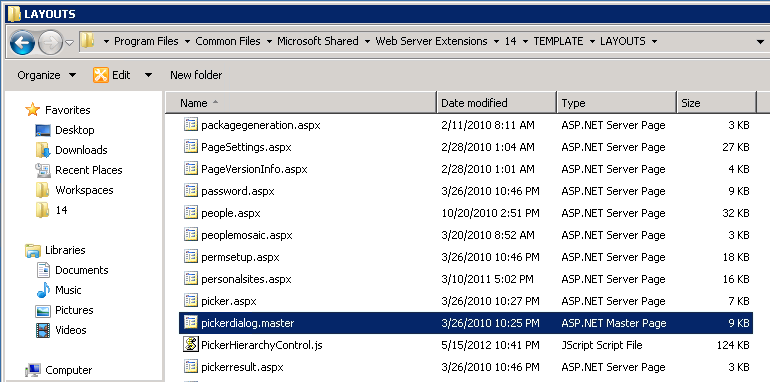
    Here’s the file from Service Pack 1

    picker-dialog-pre-CU

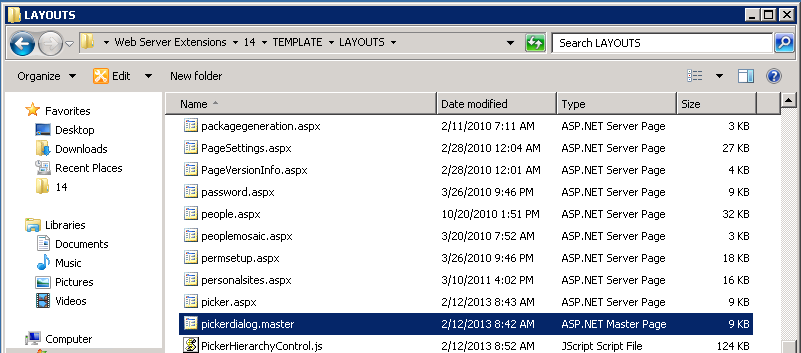
    And here it is from April 2013 CU.  Based on the file date, it may have actually been the February 2013 CU that introduced the change.

    picker-dialog-post-CU

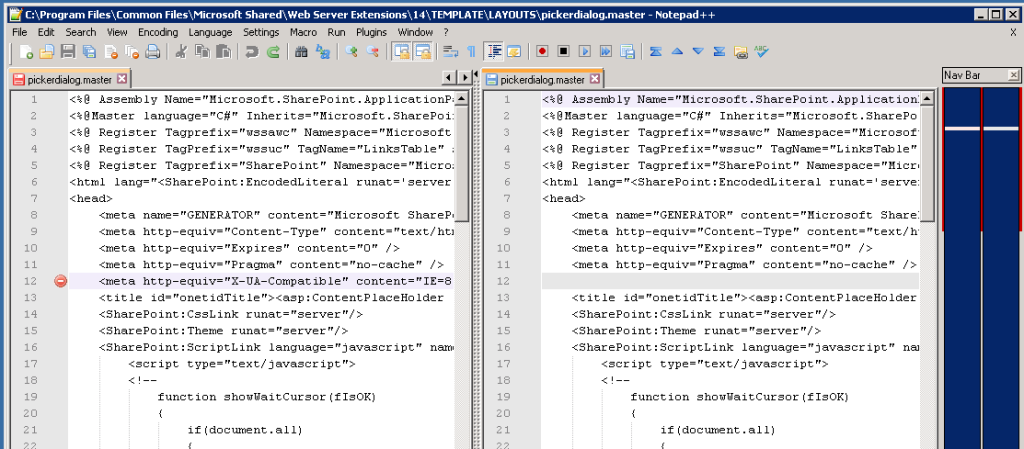
    To see what exactly had changed, I used Notepad++ to compare the two files.

    picker-dialog-compare

    As can be seen, the 2013 file (on the left) had a new meta tag added to force the display mode for Internet Explorer.  It appears that this caused IE to misreport the content height while resizing the dialog.

    Simply commenting out the extra meta tag allowed the dialog to resize properly in Internet Explorer.

    add-web-part-fixed

    For SharePoint 2010 sites using the 2010 User Experience (that is, UIVersion = 4), this is a non-issue since the Add Web Part selector is part of the ribbon, not in a dialog window.

  • Find a happy place

    Find a happy place

    There are certainly more stressful jobs than being a software developer.  Still, there are unique pressures that come with the territory when working to ship a product, support a product, or (in my case) serve a client and their systems.

    Let’s face it, when dealing with technology, or sometimes end users, we can often feel like Peach from Finding Nemo under attack from Darla.

    Finding your own happy place is an important part of being a successful worker, developer, parent, and person.

    Stress management comes in all forms.  For some it is a quiet space, a book, and hot tea.  For others it may be an intense workout at the gym.  Still others may find a simple walk around the office park to be enough to clear the mind and refresh one’s thinking.

    For me, it is lunch by the lake.

    Near my office is a country club that has a lake.  Along that lake is a road.  And along that road I will park my car and eat my lunch.

    MacGregor Downs lake

    Sitting by the lake gives me a chance to get perspective.  Whatever broken code or failed install or bizarre client request befalls me is safely tucked back at the office.  Across the lake I can see people playing mid-day tennis.  Around the corner, a lucky few are teeing off in their round of golf.

    The lake is a reminder that there is more to life than work.

    Coming to and from the lake is a motivator, as I pass by country club homes with luxury sedans parked in their driveways.  I believe working hard will reap benefits, and pressing on through whatever the day’s stress may be will inevitably teach me something.

    What is your happy place?  Do you go there often enough?

  • Picking a Mobile Web Strategy

    In the ongoing development roadmap for HomeSpot HQ is a simple item: Create a Mobile Optimized Site.  By itself, it is a pretty straightforward task.  We designed the HomeSpot HQ site for a 1024×768 browser window.  And while most of the modern mobile devices will render this site satisfactorily, there is definitely something about a truly optimized browsing experience when using the scaled down browser on an iPhone or (in my case ) Droid Incredible.

    Web or Native

    Our first strategic decision has been to focus first on an optimized website in lieu of a native mobile app.  There are plenty of reasons for leading with this approach:

    • the ability to leverage our existing code base vs. managing multiple code lines per device
    • broader device audience vs. per device versioning
    • avoiding deployment channels (and cost) via AppStore or Android Market

    As HomeSpot is an ASP.NET MVC application, I was able to use some guidance from Scott Hanselman about having a parallel set of Views for the mobile browser set that run alongside the default set of Views for the traditional browser set.  This approach allowed me to use my existing Controllers and (with a few exceptions) reuse the Models without modification.  Compared to rewriting in Java or learning Objective C to target their respective device platforms, this approach represented the fastest path to mobile coverage.

    Split or Common Site

    The other choice I made was to keep the mobile version and desktop version of the site under the same Url.  There are several pros and cons to this approach, and there may in fact be some ramifications I will have to deal with down the road.  So, the user experience will be such that if you view the site on a recognized mobile device, you’ll be served the mobile optimized Views, otherwise you’ll get the normal desktop Views.  The Url won’t change between the two versions.

    The advantages of this approach, so far as I have thought about them, include

    • easier deployment process with only one site to manage
    • unified Google Analytics

    However, there are some trade-offs:

    • lack of distinct Url such as “m.homespothq.com”
    • inability to easily deploy code fixes just to mobile site independent of main site
    • trickier to allow mobile users to view the non-mobile site if they so choose.

    Mobile Web Framework

    The final decision I chose to make was picking a mobile optimization framework.  I looked at iui and jquery mobile primarily, and decided to go with jquery Mobile.  While it is still emerging from an alpha stage, it appears to be meeting my expectations so far.  I’ll create additional posts with more specific commentary on this platform.

    The Mobile Optimized HomeSpot site is still under development and initial testing.  Given the limited time afforded to me to contribute to my own side-hustle, I hesitate to even offer a ship date.  Still, it has been a good exercise to weigh out the various options for reaching a mobilized audience.

  • Integrating with Amazon Simple Email Service (SES)

    Amazon recently announced the release of their Simple Email Service for use by developers.  In doing so, Amazon opens up a pay-as-you-go email sending mechanism that is tailored for application developers.

    Sending system generated email messages has always proven to be a challenge for developers.  It’s not for lack of means to do so, it’s dealing with a multitude of anti-spam safeguards imposed by ISPs and hosting providers.  Some block outbound sending altogether, and many throttle the number of messages that can be send per day/hour/minute.

    Amazon’s SES provides a great deal of infrastructure, and uses a variety of proven methods to help ensure deliverability of your message.  Their quota system is dynamic, so the more you prove your messages are legitimate, the more you can send.

    Setting up your SES account.

    If you already have an Amazon Web Services account, adding on the Simple Email Service is pretty straightforward.  You’ll get a confirmation email from Amazon to click through and activate the service.  Initially, you’ll be set up in a Sandbox, and there is a process for requesting Production Access.

    Getting your Access Keys

    After you have enabled the service, you’ll need a set of credentials to use it.  Again, if you already have an AWS account, you’ve probably got your Access Keys set up already.  Like any credentials, keep them safe and secure.  If someone were to gain access to your AWS keys, they could send email through SES without your knowledge.

    Verifying an email address.

    Before you can send outbound messages through SES, you have to verify the source email address.  Amazon provides a small collection of scripts used to communicate via command line to the SES services.  Follow the Getting Started guide’s instruction to prepare a file containing your AWS Access Keys and verify a sending address.  SES will generate a response email to the address you are verifying, within which is a link you’ll have to click in order to complete the verification.

    Downloading the Amazon Web Services API.

    Amazon offers a couple of methods for leveraging the SES API.  You can use the scripts downloaded to verify your source address to also send messages.  I chose, however, to use their packaged .NET SDK library.  It contains wrappers for all of Amazon’s Web Services, including the SES.

    After downloading and unpacking the SDK, you can add a reference to the AWSSDK.dll assembly to your project.

    Using the SES API methods.

    Creating and sending email via the SDK then becomes a matter of setting up the outbound SES message object and sending it through the API.  The following method takes a standard .NET MailMessage object and translates it to a SES message, then sends it along.

    Public Function SendMessage(ByVal message As System.Net.Mail.MailMessage) As String Implements Core.DataInterfaces.IMailServer.SendMessage
    
                If String.IsNullOrEmpty(_accessKey) Or String.IsNullOrEmpty(_secretKey) Then Throw New Exception("API Credentials are required to use this provider.")
    
                Dim ses As New AmazonSimpleEmailServiceClient(_accessKey, _secretKey)
    
                Dim messageToSend As New Amazon.SimpleEmail.Model.SendEmailRequest
    
                'set up addresses
                messageToSend.Destination = New Amazon.SimpleEmail.Model.Destination
    
                For Each toAddress In message.To
                    messageToSend.Destination.ToAddresses.Add(toAddress.Address)
                Next
    
                For Each ccAddress In message.CC
                    messageToSend.Destination.CcAddresses.Add(ccAddress.Address)
                Next
    
                For Each bcAddress In message.Bcc
                    messageToSend.Destination.BccAddresses.Add(bcAddress.Address)
                Next
    
                'set reply to
                If message.ReplyTo IsNot Nothing Then
                    messageToSend.ReplyToAddresses.Add(message.ReplyTo.Address)
                End If
    
                'set subject line
                messageToSend.Message = New Amazon.SimpleEmail.Model.Message
                messageToSend.Message.Subject = New Amazon.SimpleEmail.Model.Content().WithData(message.Subject)
    
                'set message body
                If message.AlternateViews.Count > 0 Then
                    Dim messageBody As New Amazon.SimpleEmail.Model.Body()
    
                    For Each view In message.AlternateViews
                        Dim viewStream = view.ContentStream
                        Dim viewData(viewStream.Length) As Byte
                        Dim viewContent As String = System.Text.Encoding.ASCII.GetString(viewData, 0, viewStream.Read(viewData, 0, viewData.Length))
    
                        If view.ContentType.MediaType.Equals("text/html") Then
                            messageBody.Html = New Amazon.SimpleEmail.Model.Content(viewContent)
                        Else
                            messageBody.Text = New Amazon.SimpleEmail.Model.Content(viewContent)
    
                        End If
                    Next
    
                    messageToSend.Message.Body = messageBody
                Else
                    messageToSend.Message.Body = New Amazon.SimpleEmail.Model.Body(New Amazon.SimpleEmail.Model.Content(message.Body))
                End If
    
                'set from address
                messageToSend.Source = message.From.Address.ToString
    
                'send message
                Dim sendResponse As Amazon.SimpleEmail.Model.SendEmailResponse
    
                sendResponse = ses.SendEmail(messageToSend)
    
                Return sendResponse.SendEmailResult.MessageId
    
            End Function
        End Class

    Lessons Learned

    A few things I learned to keep in mind:

    1. The reply-to address also has to be verified, just like the sending address.
    2. As a new account with Production Access, you’ll have a 1,000 message per day quota.
    3. There is a Send Rate limiter for the number of messages per second.  You’ll have to account for this limit in your code to ensure that it doesn’t fail mid-way through your batch of messages.

    Amazon’s service is easy to use, economical, and capable.  I probably won’t replace every outbound message instance with SES, but definitely for cases where I need to generate larger batches (such as monthly newletters or maintenance reminders) I will leverage SES.

  • Launched! HomeSpot AgentPro goes live.

    Countless late nights are behind me as I joyfully announce the launch of our newest HomeSpot product, AgentPro.

    https://www.HomeSpotAgentPro.com

    AgentPro allows professionals in the real estate and home improvement industries to leverage our consumer product HomeSpot HQ as an economical and value-adding marketing platform.

    Do you know a real estate agent who’s looking for a creative new way to stay in front of their clients in 2011?  Tell them about AgentPro today.