Category: Featured

  • Dad Status Indicator

    Dad Status Indicator

    It’s April, 2020. Since mid-March we have been told to work exclusively from home. Schooling has moved to ‘distance learning.’ Statewide ‘stay-at-home’ orders have been issued across the country and beyond. This is COVID-19 and the new realities facing ours and every culture worldwide.

    How do I respond? Build something.

    Working from home isn’t new to me, but WFH with all my kids also in the house is a totally different dynamic. And with most of my workday spent interacting with my coworkers via web calls, the need for some aspect of privacy is more important than ever.

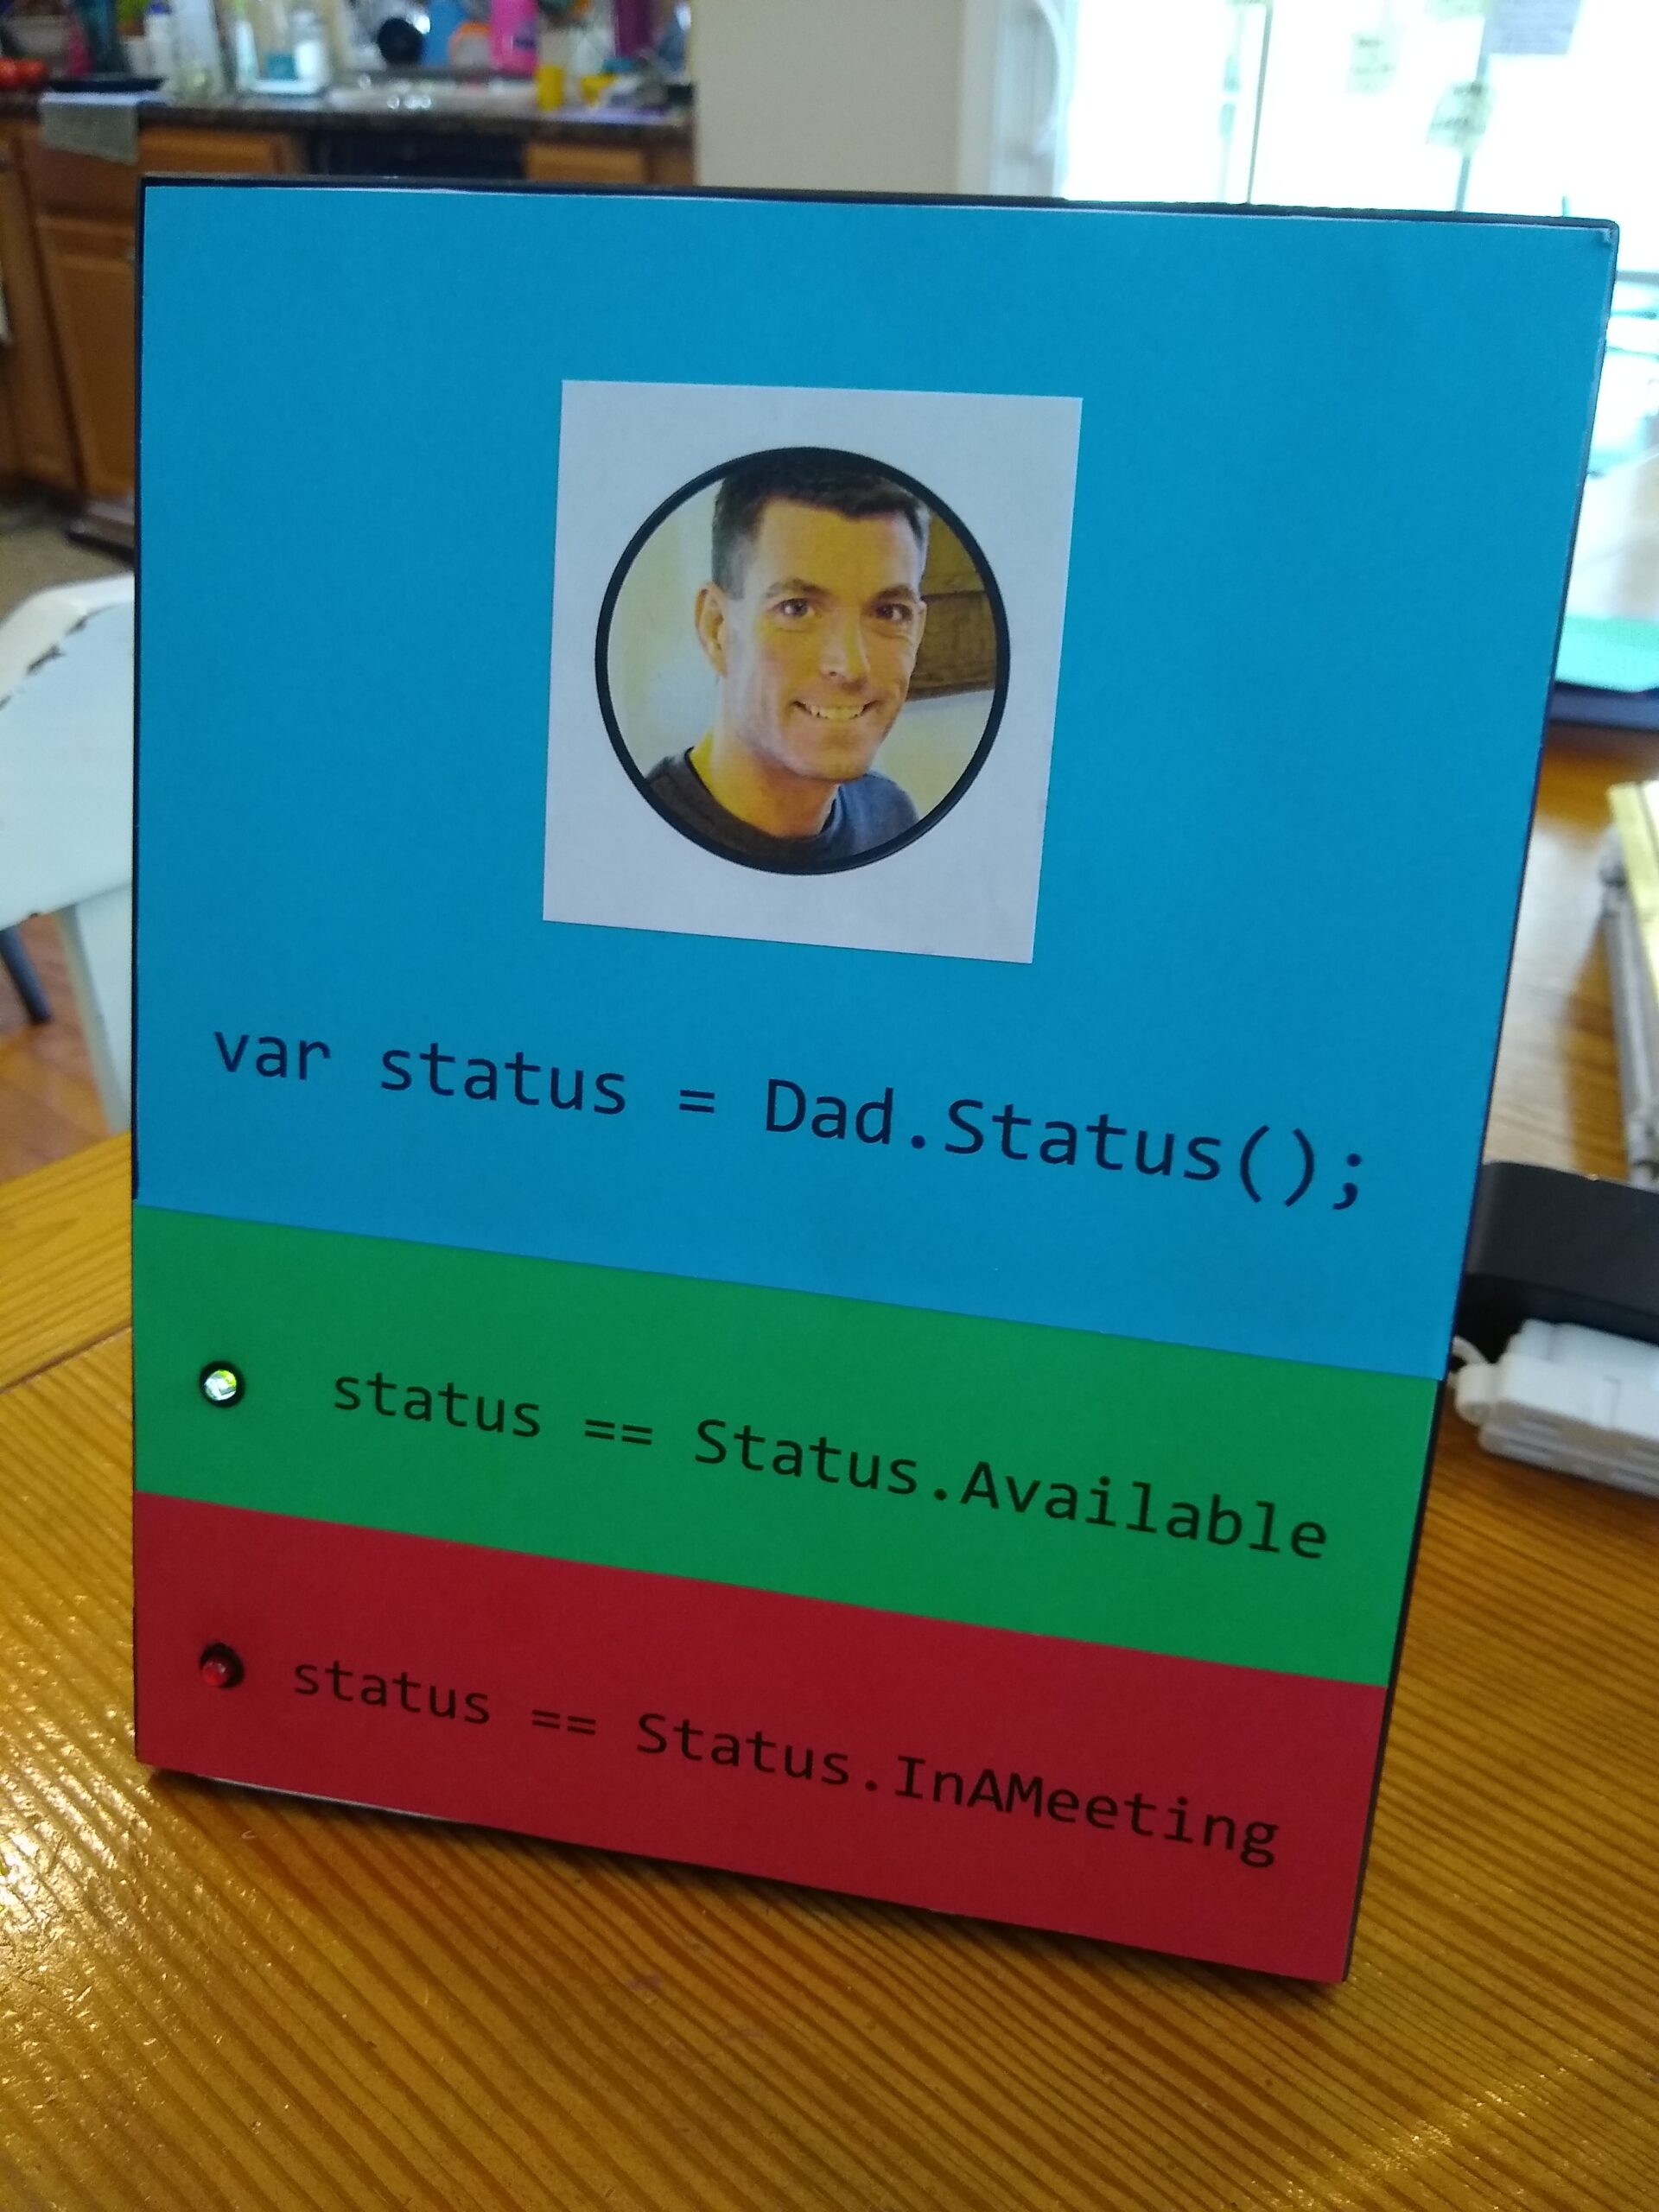
    Hence, the Dad Status indicator.

    A simple way to show my family whether or not I am available to solve their problem, hear their tale of woe about the terrible thing their sibling did, or make lunch.

    The Dad Status Indicator (DSI) is a simple IoT rig using a Particle Photon and a couple colored LEDs. I also put together a quick web-app so I can toggle the status from my browser or phone.

    Materials

    • Picture frame
    • foam core
    • colored card stock
    • 1 Particle Photon
    • breadboard
    • 1 RED LED
    • 1 GREEN LED
    • LED holders
    • 1 2.2k resistor
    • 18 gauge wire

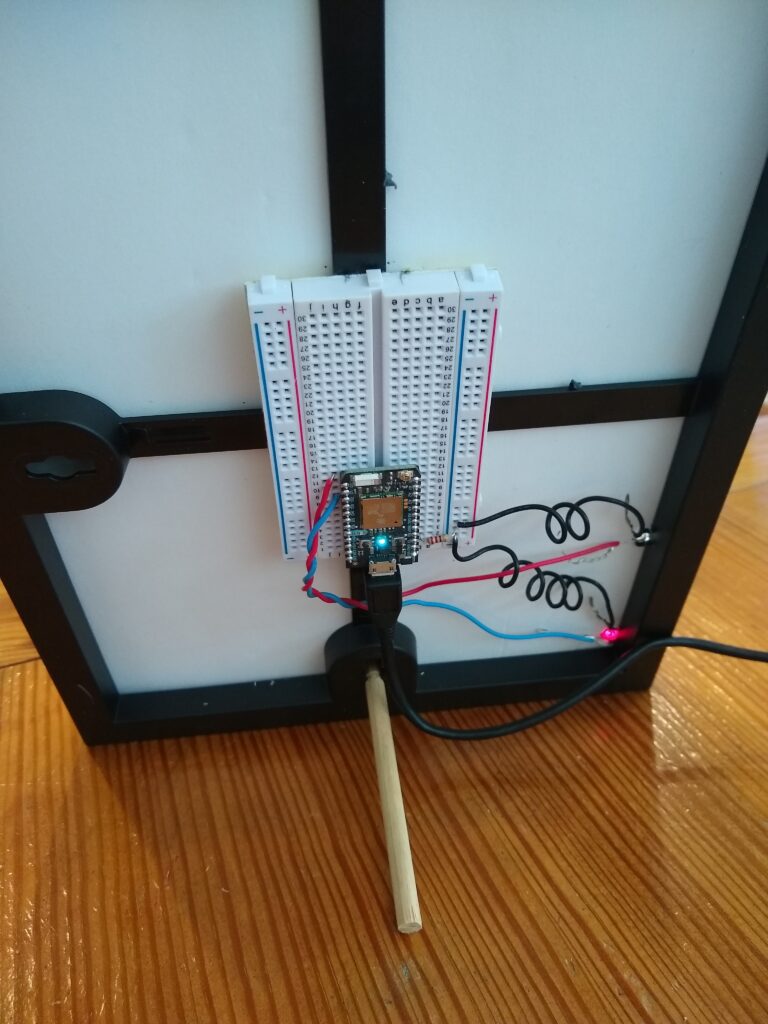
    After printing the status message and text on to the card stock, I cut the foam-core to size to fit right in the picture frame. The card stock panels are then glued to the foam core.

    I used a nailset to punch the holes through for the LEDs to be inserted.

    There is no glass on the frame, mostly due to how the LEDs project out a bit.

    Wiring

    I used 2 digital pins on the Photon for the LEDs, and put the resistor inline with GND. Remember with LEDs the short leg is GND and the long leg is power.

    Code

    Particle is largely an event based platform, so subscribing to an event stream is pretty straightforward.

    Subscribe

    Here’s the Firmware code used to receive messages from the event topic and act accordingly:

    // Daddy status indicator
    
    int greenLed = D0; 
    
    int redLed = D3; 
    
    void setup() {
      #if defined(DEBUG_BUILD)
        Mesh.off();
        BLE.off();
      #endif
    
      // init pins
      pinMode(greenLed, OUTPUT);
      pinMode(redLed, OUTPUT);
      
      // subscripbe for events  
      Particle.subscribe("daddy/status", statusHandler);
      
      // init status as available
      digitalWrite(redLed, LOW);
      digitalWrite(greenLed, HIGH);
    
    }
    
    // loop method not needed
    void loop() {
    }
    
    
    // event subsription handler
    void statusHandler(String event, String data) {
        if (data == "available")
        {
            digitalWrite(redLed, LOW);
            digitalWrite(greenLed, HIGH);
        }
        else if (data == "occupied") 
        { 
            digitalWrite(redLed, HIGH);
            digitalWrite(greenLed, LOW);
        }
    }
    

    Since the events are published using the Particle API, you do need to subscribe using the ALL_DEVICES parameter, and publish the event as a Public event.

    More information about the Particle.subscribe() usage can be found on the Particle Docs site.

    Publish

    To publish the events, I’m using the REST API provided by Particle. You need to generate an access token (I used the Particle CLI tool for this) and include that in your API Post.

    Here’s the bit of Javascript used to publish to the API

    var available = 1;
    var occupied = 0;
    
    var apiUrl = "https://api.particle.io/v1/devices/events";
    var token = "[[insert Particle access Token here]]";
    
    function UpdateAvailability(state) {
        var data = {
            name: "daddy/status",
            data: state ? "available" : "occupied",
            private: "false",
            ttl: "60"
        };
    
        fetch(apiUrl, {
                method: 'POST', // or 'PUT'
                headers: {
                    'Content-Type': 'application/json',
                    'Authorization': 'Bearer ' + token
                },
                body: JSON.stringify(data),
            })
            .then((response) => response.json())
            .then((data) => {
                console.log('Success:', data);
                WriteSuccess(state);
            })
            .catch((error) => {
                console.error('Error:', error);
            });
    }
    
    function WriteSuccess(state) {
        var feed = document.querySelector("#messages");
    
        let newEl = document.createElement('li');
        newEl.classList.add('list-group-item', 'text-white');
        newEl.classList.add(state ? 'bg-success' : 'bg-danger');
        newEl.innerText = 'Status set to ' + (state ? 'available' : 'occupied') + ' at ' + new Date().toLocaleString();
        feed.prepend(newEl);
    }

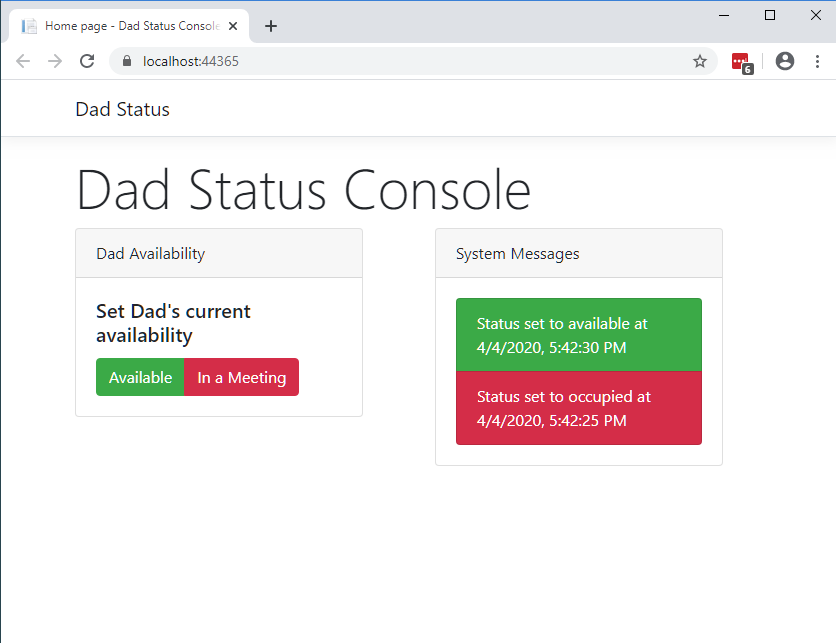
    After each post, I am displaying a status message in a feed.
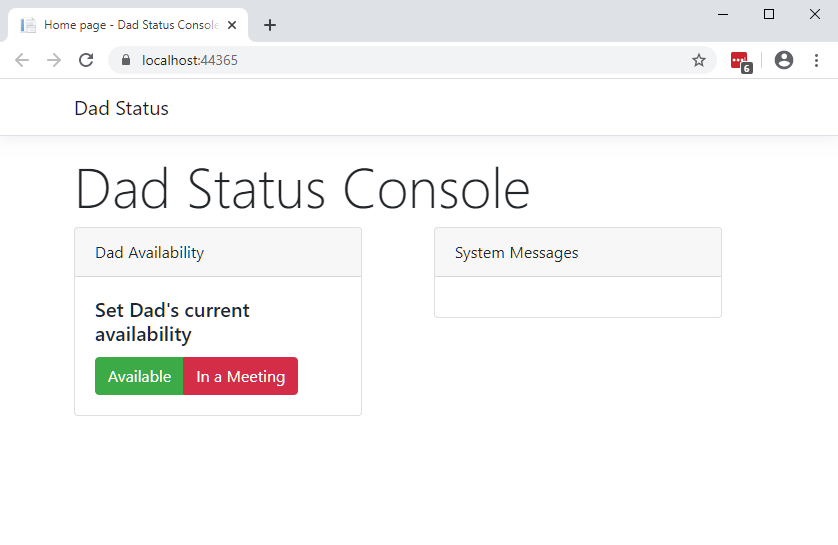
    Web app

    The web app is super simple. Just a couple buttons to trigger the post and a feed showing the history.

    As the buttons are clicked you can see the message list update.

    All the code for this project can be found on Github at https://github.com/smithderekm/daddy-status-indicator

    Future Enhancements

    Now that the foundation is set, we can build upon it.

    • Use Dash button intercept to change status – single click for Occupied; double-click for Available;
    • Subscribe to Outlook calendar to get meetings feed and automatically update status at start and end of each meeting.

  • DIY Quad Monitor Stand

    DIY Quad Monitor Stand

    While working from home has been a normal for me for some time, the 2020 COVID-19 social distancing mandate has added another element to making my home office even more functional. This time around, I wanted to finally get a rig set up so that I could effectively use all four of the LCD monitors in my possession.

    So, in the spirit of DIY and building things out of my favorite material – 3/4 in plywood – I set out to design a quad monitor stand that could sit atop my desk and fit under the shelving above.

    The Before Shot

    Here’s how I was previously set up with only 2 monitors on a simple riser. Insert blanket “Please excuse the mess” comment here.

    The total spacing between the desktop and the shelves about is about 29 inches.

    Planning out the build

    I looked at a lot of pre-fabricated and other DIY designs. Prices for 4-monitor stands online ranged from $50 to $100. There were a few 2 and 3 monitor designs I found that used black pipe. In the end, I went for a lattice type design rather than having a single central vertical component with horizontal ‘wings’. I suppose if I was using metal components that would work, but with wood I was worried the weight would be too much to support.

    I began by laying out the monitors on the floor and taking measurements.

    Since each pair of monitors was a different size, I aligned them on the mounting brackets. I was okay with the gap in the middle since I planned to have my webcam sit in that space.

    One thing I also had to consider (though in the end I did not make any adjustments) was that each set of monitors was a different thickness. The older monitors were a full inch thicker than the newer ones.

    The Design

    I decided to use 2 vertical supports aligned on the monitor mounting locations, connected with 2 horizontal pieces for rigidity. I would then simply add small feet to the base on each side to help the rig stand freely and not tip forward.

    Here’s the cutlist I ended up with:

    DimensionQuantity
    Vertical Support3/4″ x 2 1/2″ x 27″2
    Horizonal Support3/4″ x 2 1/2″ x 23 1/2″2
    Feet3/4″ x 2 1/2″ x 6″4
    Feet Spacers3/4″ x 2 1/2″ x 2 1/2″2
    Small mounting plate1/2″ x 4 1/2″ x 3 1/2″2
    Large mounting plate1/2″ x 4 1/2″ x 4 1/2″2

    I made the monitor mounting blocks using 1/2″ plywood. I had a fabricated VESA mounting plate that I could use to transfer the screw placement on to these blocks.

    Using a table saw to rip down the plywood, a miter saw to cut length, and a drill to create the screw holes, I had all my components ready.

    Mounting plates. Screw hold placement transferred from an existing mounting plate.
    Top: feet; Middle: horizontal supports; Bottom: vertical supports;

    Assembly

    Assembly was pretty straightforward, though I did a lot of dry fitting to check alignment with the actual monitors to make sure that everything lined up as expected. I also had to ensure the vertical placement of the mounting plates was correct so the monitors were not too high to fit under the shelves above my desk.

    I used 1″ drywall screws to attach all pieces together. I chose not to use glue but it wouldn’t hurt to ensure the security of all the joints.

    Initial setup of frame
    Added second horizontal support after checking positioning against actual monitors.
    Mounting plates attached. I used additional screws here to account for weight of monitors.

    To ensure the placement, I did another dry fit against the monitors to ensure the spacing and vertical placement was correct. In my case the lower plates are 7 3/8″ up from the bottom, and the uppers are 19 3/4″ up.

    Feet attached

    Hardware

    I’m guessing it’s a universal standard, but the mounting screws used are metric with the following spec: M4-0.7.

    At Home Depot I found both 25mm (about 1″) and 30mm (about 1 1/4″) length screws. These are not on the big racks of packets in the hardware aisle, but rather in the drawers with more specialized hardware.

    I also used small washers – and in the case of the 30mm screws, I used 5 washers to create a spacer.

    Mounting the monitors was the moment of truth. Would the plates and screw holes all line up. Wow – got it on the first try!

    Top is 25mm screw with 1 washer. Bottom is 30mm screw with 5 washers.

    The After Shot

    All monitors mounted beautifully. Notice the 1 1/4″ hole I had to drill in for the lower monitors. Some design genius at Lenovo decided putting the power cord outlet directly below the mounting plate was a good idea. This hole allows the cord to go directly in, and in the long run might be the only flaw or risk in my design since obviously removing 60% of my vertical support there weakens the integrity of the plywood. So far, though, it appears to be okay.

    I also found that the mounting plate for the lower-left monitor appears to be slightly out of alignment (as shown by the clockwise misalignment in the gap between the top and bottom monitors.) I will need to adjust this slightly.

    Here’s the final install on the desktop. I have 2 computers (desktop and laptop) so here’s the configuration I used to wire up each:

    Laptop: HDMI out goes to lower left; USB-toVGA adapter goes to lower right; VGA out goes to KVM switch tied to upper right.

    Desktop (has 2 DisplayPort outputs): DisplayPort-DVI #1 goes to upper left; DisplayPort-DVI #2 goes to upper right;

    When I’m in work mode, I have the laptop driving 3 out of 4 monitors (shown with grey background), and only the upper-left one is displaying for the Desktop PC (with blue background.) I am using Mouse without Borders to create a seamless drag experience between all 4 monitors.

    In non-work mode, I can have my Desktop PC drive the two upper monitors.

    I am really satisfied with how this turned out. I spent about $5.00 on the hardware and used up several pieces of plywood scrap. Now, let’s get this WFH thing rolling!

  • Spaghetti was easier

    Spaghetti was easier

    A couple weeks ago, I saw the following image in my Twitter feed:

    I, for one, am old enough to have lived through all 3 of these paradigms for software architecture. The team on which I am a part has been strategically tasked largely with taking a spaghetti codebase and moving to ravioli. So the analogy fits (though in retweeting this pic, I did claim to be a bit more of a tortellini fan myself.)

    That said, what is not illustrated in this infographic is the complexity associated with each form. Arguably, spaghetti is easier, mostly because you can avoid caring about things.

    Attention to architecture creates a burden that developers must appreciate in order to deliver.

    Case in point: If I don’t care about architecture, I can create a single web page that connects directly to my database from the server-side code-behind. This was not unusual in the spaghetti days. Every page opening its own database connection. Defining its own objects (that is, unless you just use the DataRow.) In the spaghetti days, there was no Pragmatic principle of Don’t Repeat Yourself. We were proud of ourselves for making it work, and moved on to the next strand.

    Today, our system has the following flow to query a database:

    Client UI Page -> Controller -> API Wrapper -> API -> Provider -> DataStore -> ORM -> Database

    Now we have a Visual Studio solution containing 10 or 12 assembly projects to accomplish the same thing we used to do in a single page. We transform a database record to an entity, then to a Data Transfer Object, then to a Query result, then to a json object, then to a result object, then to a model.

    Because now we care. We’ve learned to care over the last 3 decades because there is inherent value in the architectures when it comes to code reuse, reliability, and testability. But now, ravioli making takes time.

    https://tenor.com/view/ravioli-pasta-dinner-cooking-gif-3455458

    In my own journey towards ravioli, I’m learning to appreciate the steps. The beauty of component parts, each tasked with a single purpose, able to live in their own cozy pocket of dough. But the cost of that coziness is time, fore-though and planning. It’s an investment, and reminds us that software, like artisan pasta making, is a craft.

  • My new Microjobs are live

    My new Microjobs are live

    I am really excited to announce that I am joining Collab365 MicroJobs – a brand new marketplace dedicated to Microsoft professionals. I have launched 2 initial offerings.

    The first is focused on organizations who believe they may benefit from developing an Internet of Things strategy.  To these organizations, I will host a 1 hour IoT brainstorming session.

    Here are 4 reasons that the Collab365 Team have spent months building the site:

    1. You often need expert Microsoft help just for a couple of hours.
    2. You can’t keep up with everything Microsoft is releasing.
    3. You find it hard to find Microsoft experts on other non-dedicated sites. There are just too many other subjects covered.
    4. You don’t have time to go through a lengthy interview process.

    Here are the details of this offering:

    How I can help you …

    The Internet of Things is revolutionizing every type of business in every sector?  But with so much to sift though, it can be overwhelming to know how to get started.

    Do you think your business, company, industry could catch the IoT wave, but you’re not sure where to begin?  This one hour brainstorming session will help you begin to form a strategy for considering, planning, and implementing an IoT solution to digitally transform your business.

    In this session, we’ll explore questions like:

      1. What are the unknown data points in our business that need to be captured?
      2. How could an IoT solution open up a new revenue opportunity for our company?
      3. Where does our company spend the most time/money fixing things after they become problems?

    This session will be recorded and provided to you for ongoing review, and follow on planning sessions can be added to continue your IoT journey.

    We will perform this session as a 1 hour Skype call (or other similar web conferencing platform.)

    How does it work and what about payment?

    Paying for online services with people that you don’t know can be worrying for both parties. The buyer often doesn’t want to pay until they’re happy that the Provider has completed the work. Likewise the Provider wants to be sure they will be recompensed for their time and commitment. Collab365 MicroJobs helps both the buyer and the seller in these ways:

    1. The buyer pays up front and the money is securely held in the MicroJobs Stripe Connect platform account.
    2. The Freelancer can then begin the work in the knowledge that the payment has been made.
    3. Once the buyer is happy that the work is complete and to their satisfaction, the funds become available to the Freelancer.
    4. There’s even a dispute management function in case of a disagreement. But it won’t on my MicroJob! As long as we agree what’s needed up front and keep talking the entire way through, you won’t be disappointed.

    Note: Once I’ve completed the work, I’d love it if you could write a review for me. This will allow others to see what a fantastic job I did for you.

    What if we need to add extra’s to the job after I’ve started?

    It’s really easy for us to discuss your extra requirement (using the chat feature on the site) and for us to agree a price and add it to the order.

    If you’d like me to help you, here are the steps to hire me …

    1. View my MicroJob.
    2. On that page click the “Buy” button.
    3. You’ll need to register as a buyer on the MicroJobs site, but this only takes a minute and will also allow you to purchase MicroJobs from other awesome Freelancers.

    If you need to contact me then please use the “contact” button and ask me any questions before purchasing.


  • How to Use Cortana to control your Hue lights

    How to Use Cortana to control your Hue lights

    For Raleigh Code Camp this year I thought I’d stay in the realm of IoT, but also bring together some latest and greatest sweetness.  So my talk is titled “Hey Cortana, turn on the lights” and is a fun walkthrough of using Cortana, Universal Windows apps on Windows 10, the Azure Service Bus, and the Hue API to control your lighting with your voice.

    Here are all the reference articles I used in preparing the talk, and the slides, code, and video will be posted after the event.

    http://www.instructables.com/id/Use-RPi-Azure-and-Cortana-to-Automate-your-Home/?ALLSTEPS – this article was my inspiration and provides a good overview of the various elements of this solution.  I updated for Windows 10, and did not use a Raspberry Pi (though now with the RPi 2 and Windows 10 IoT Core it would not be that difficult.)

    http://talkitbr.com/2015/07/13/integrando-a-cortana-em-seu-aplicativo-windows-10/ – this one is in Portuguese, but still shows how to structure the Voice Command Definition file.

    https://dev.windows.com/en-us/speech – the official page for the Speech SDK from Microsoft

    https://msdn.microsoft.com/library/windows/apps/xaml/mt185598.aspx – Cortana Interactions – good overview with example for adding VCD to your Windows 10 app

    https://github.com/Microsoft/Windows-universal-samples/tree/master/Samples/CortanaVoiceCommand/cs/AdventureWorks/Common – this is a sample project provided by Microsoft.  It seemed slightly out of date, but was a good reference.

    https://www.visualstudio.com/products/visual-studio-community-vs – Download page for Visual Studio 2015 Community edition.  You need VS2015 to do universal app development

    http://www.developers.meethue.com/ – the Phillips Hue developer site.  To get access to the full API docs you’ll need to register, but they have a getting started page here as well.

    https://github.com/Q42/Q42.HueApi– a .NET wrapper for the Hue API.  I didn’t use this directly, but modeled my own wrapper after it, and found it helpful for some of the JSON handling.

    https://azure.microsoft.com/en-us/documentation/articles/service-bus-dotnet-how-to-use-topics-subscriptions/ – article with code samples for interacting with the Azure Service Bus as a publish and subscriber

    http://blogs.recneps.org/post/Raspberry-Pi2-Iot-Core-and-Azure-Service-Bus – example of using the Service Bus REST api since the full SDK is not yet available for Windows 10

    https://msdn.microsoft.com/en-us/library/azure/hh690922.aspx – how to send messages using REST to the Service bus queue

    https://azure.microsoft.com/en-us/documentation/articles/service-bus-queues-topics-subscriptions/ – another overview of the Service Bus with code samples


  • How does co-editing work in SharePoint 2013?

    How does co-editing work in SharePoint 2013?

    This week I was on site with a client discussing how to further leverage SharePoint in their business, and our conversation came around to how to better equip their field engineers and staff.  Specifically, I shared about the document library Sync feature.  One question came up regarding how SharePoint will reconcile changes if one employee modifies a file from their synchronized local copy, and another employee modifies the file directly from the Document Library.

    It’s a typical question and one I thought I’d answer using a live demo.  The video below illustrates how co-editing can work for both online and offline users.  I hope you find it helpful.

    (BTW: I’m going to try to start creating more of these kinds of Q&A videos, so if you have a suggestion for a question or explanation of a SharePoint feature, please comment on this post and share your idea.)

  • New SharePoint library not showing in Quick Launch after selecting Yes in Library settings

    New SharePoint library not showing in Quick Launch after selecting Yes in Library settings

    A client reported this issue to me this week.  They had added a new Document Library to a Team Site, and had assigned specific permissions to it.  However, it was never being displayed on the Quick Launch navigation.

    We checked the obvious things:

    1. Yes, the Display this document library on the Quick Launch? setting was set to Yes.
    2. Yes, the user had permissions to the site and document library.
    3. We hid and then displayed the Quick Launch using the Site Settings -> Tree View options.

    While initially we thought this might be some weird behavior in permissions, I came across this post that mentioned the Current Navigation settings for the site.  So I checked there.

    I found that the Current Navigation settings were fine, set to display the navigation items below the current site.

    What I also found, however, was that the Structural Navigation: Sorting option was set to Sort Manually.  When I looked in the list of items available for editing and re-sorting the navigation items, the new Library was not shown.

    navigation-sort

    So I flipped the setting to Sort Automatically, and voila, the library appeared in the Navigation items display.  As soon as I saved the navigation settings with the automatic sort, the library also appeared on the Quick Launch menu.

    It appears that if the manual sort option is in force, then it is based on a snapshot of the navigation items, and you’d have to manually add the newly added library to the Navigation hierarchy.

    Hope that helps someone out there!

  • RDU Code Camp 2014 – Creating a content strategy for your personal brand

    RDU Code Camp 2014 – Creating a content strategy for your personal brand

    This year’s Code Camp was a great success and I was honored to be selected as a speaker for a 2nd year in a row.

    In this session I talk about how to differentiate yourself in the marketplace by establishing and maintaining a personal brand.  We had some great practical discussion, and I appreciate all who attended and asked questions.  For those who weren’t able to join us, the video of the session is offered below.

    Thanks to all the sponsors and volunteers for this year’s Code Camp.  It was a great time to learn, meet new people, and be reminded of how strong the .NET development community is around the Triangle.

  • What’s New in ASP.NET Identity and other valuable lessons learned

    This month I had the opportunity to fulfill one of my goals for 2014 by presenting to the Triangle .NET User group.  This was a fun night with some great interaction.

    However, I learned a valuable lesson.  No matter how much you prepare, there will always be something unexpected.

    I always record my presentations.  I do this for several reasons.  First, it gives me the ability to share with the community and benefit those who can’t attend an event.  Secondly, I use them to learn and improve my own presentation style and skill.  Watching myself, getting over-sensitive about my verbal tics (you know?), and seeing how I interact with the audience are all things that help me get better as a speaker.

    This event was no different – I’d gotten to the venue early, made sure all my slides and demos were in order, and checked Camtasia to make sure recording would work on the projector (every venue is different.)  Everything was in order.  I felt great.  I was ready to go.

    The first half of the presentation was going smooth.  I felt like I was hitting all my key points, and was getting good questions and comments from the audience.

    Then I took a question I shouldn’t have.  I tried to say “let’s come back to this afterwards” but somehow I got persuaded to diverge from my flow.  And then I went to set a breakpoint in the demo code so we could see what was happening.  I did something I do dozens of times a day while coding.  But this wasn’t a normal coding session.  In this case, pressing F9 to set that breakpoint in Visual Studio did more than I expected.  I didn’t catch it in the moment.

    Visual Studio never got that F9 keypress, because Camtasia intercepted it.  And did exactly what it was set to do.  It stopped recording.

    I went on with the rest of my presentation, still feeling good, still interacting with the audience, still hitting all my points and nailing my demos.  But it wasn’t recorded.

    After the meeting that night, I was at home, reviewing the video of the session.  And then it just went black.  I realized immediately what had happened.  I may have said a few words in frustration.  I was deeply disappointed.

    Eventually I composed myself and realized the teachable moment I had before me.  The opportunity to encourage others to check for the unexpected hiccup in their preparation.  To remind others and myself that the best laid plans still are vulnerable to mishaps.

    It reminded me of something I try to teach my children – that sometimes we learn best through our mistakes.

    So here is the first 47 minutes of my presentation that night.  I trust that even in its abbreviated form, there is value in the content.  But be assured, next time, Camtasia won’t listen to any hotkeys.

  • The Developer’s mid-life crisis – and 5 ways to overcome it

    The Developer’s mid-life crisis – and 5 ways to overcome it

    According to Wikipedia, a midlife crisis is:

    Midlife crisis is a term coined in 1965 by Elliott Jaques stating a time where adults come to realize their own mortality and how much time is left in their life.

    I particularly like this supporting thought, that during this time, “people may reassess their achievements in terms of their dreams.”

    I went to university in the late 1990s, a time when the Internet was emerging and the geek stereotype was being shaken off.  In those days, coding for a living wasn’t quite fully mainstream, but for those of us to pursued it, we had a promising and potentially lucrative career ahead of us.  Job prospects were strong, and it wasn’t unusual to have multiple opportunities to consider, with above-average pay, upon graduation.  At that time, I dreamed of being the guy who came up with new three-letter-acronyms and writing definitive works on a subject.

    A lot has changed in the past 20 years.  Coding today is mainstream, talked about in the media, promoted to children.  Tech success stories are commonplace, and we can’t possibly imagine a world without Google, Facebook, and Amazon.  And I, like many of my peers, find myself no longer on the bleeding edge of tech, but instead spending my time supporting and building run of the mill business apps.

    In this new environment, developers (I posit) have reached nearly commodity status.  There are lots of us.  The supply curve has changed, and while demand is still strong (the Bureau of Labor Statistics projects 22.8 percent employment growth for software developers between 2012 and 2022, much faster than average for all occupations. During that time period, an estimated 139,900 jobs will need to be filled) it’s harder and harder to distinguish oneself from their peer group.

    Additionally, the rise in new, more glamorous technologies such as mobile apps have pinched career developers in to choosing a path in which to invest their time, training, and focus.  Do we stick with the stable corporate job, or jump ship for the hip new startup?

    In short, we face a mid-career crisis.

    One day you wake up and suddenly feel like all the cool kids are doing fancy mobile apps and you’re stuck in the belly of the corporate beast writing TPS reports.  Or maybe you go to a Code Camp or conference and instead of getting rejuvenated you get depressed over all the tech that you’ll never be able to use in your job because the opportunities don’t present themselves.  In short, the crisis strikes, and when you reassess your achievements in terms of your dreams, you feel like you’ve come up way short.

    I know I’ve felt this way.

    And here’s how I overcome it.  It’s not quite like going out and buying a red convertible, but these things serve to give me a boost.

    Sign up to give a presentation or user group talk.

    One of the more rewarding things I have done in the past couple years is preparing talks for local user groups.  The key?  Always selecting a topic that I hardly know anything about.  In doing so, I create a condition for myself to learn with a deadline, powered by the fear of embarrassment.  This has been a great way for me to immerse myself in the tech topics I wouldn’t otherwise get to use in my day job.

    Start a side project.

    If your day job isn’t giving you the opportunities you want, then consider a hobby project that can be a sandbox for you to try things out.  For me, HomeSpot HQ is that project – and it routinely gives me a place to try and incorporate the hot new things.

    Start mentoring

    Rather than bemoan the next generation of developers and how easy they have it, why not invest in them.  Help teach them strong principles that make life as a developer better.  You know, things like SOLID and DRY. Or how to write good code comments. Many areas have tech summer camps that would love volunteers to help campers learn the ropes.

    Take a Twitter sabbatical

    The main channel by which I hear about all the things everyone else is working on is via my Twitter feed.  But sometimes there are days when having those constant reminders is downright depressing.  In that moment, fire a Ctrl-F4 or Command-W to blow that tab away, and find a moment to stop comparing yourself to everyone else.  Chances are, they have been (or will be) in the same place in their career.

    Commiserate with others

    Want to feel better about your situation?  Go talk with one of your peers and hear their story.  Again, it’s pretty likely they have been through the same crisis moments, and probably have some insight about how to cope constructively.  Or, they might have a horror story to tell that proves again the grass isn’t always greener.  Who knows, maybe that conversation will propel you to take action!

    If your achievements and your dreams aren’t matching up, remember that you can change either side of that equation.  Still, there are endless opportunities to achieve waiting out there for you. You just have to decide to go after them.

    Photo credit:http://commons.wikimedia.org/wiki/File:MX-5_Red.jpg